Getting started
Join your team, configure a new installation and prepare your first working day.
Install or join an instance
Your company already uses Tournevia? Ask its administrator for the HTTPS address, your username and password. Open the address and choose Sign in. The private installation code is not used for everyday sign-in.
Installing for the first time? Complete the installation guide first. The launcher creates a private setup link for the installation operator. That link opens the following flow.
Set up your company
Setup has two steps: Company & depot, then Administrator. Choose the language first, in the selector at the top of the page: the first administrator’s account keeps the language setup was completed in.
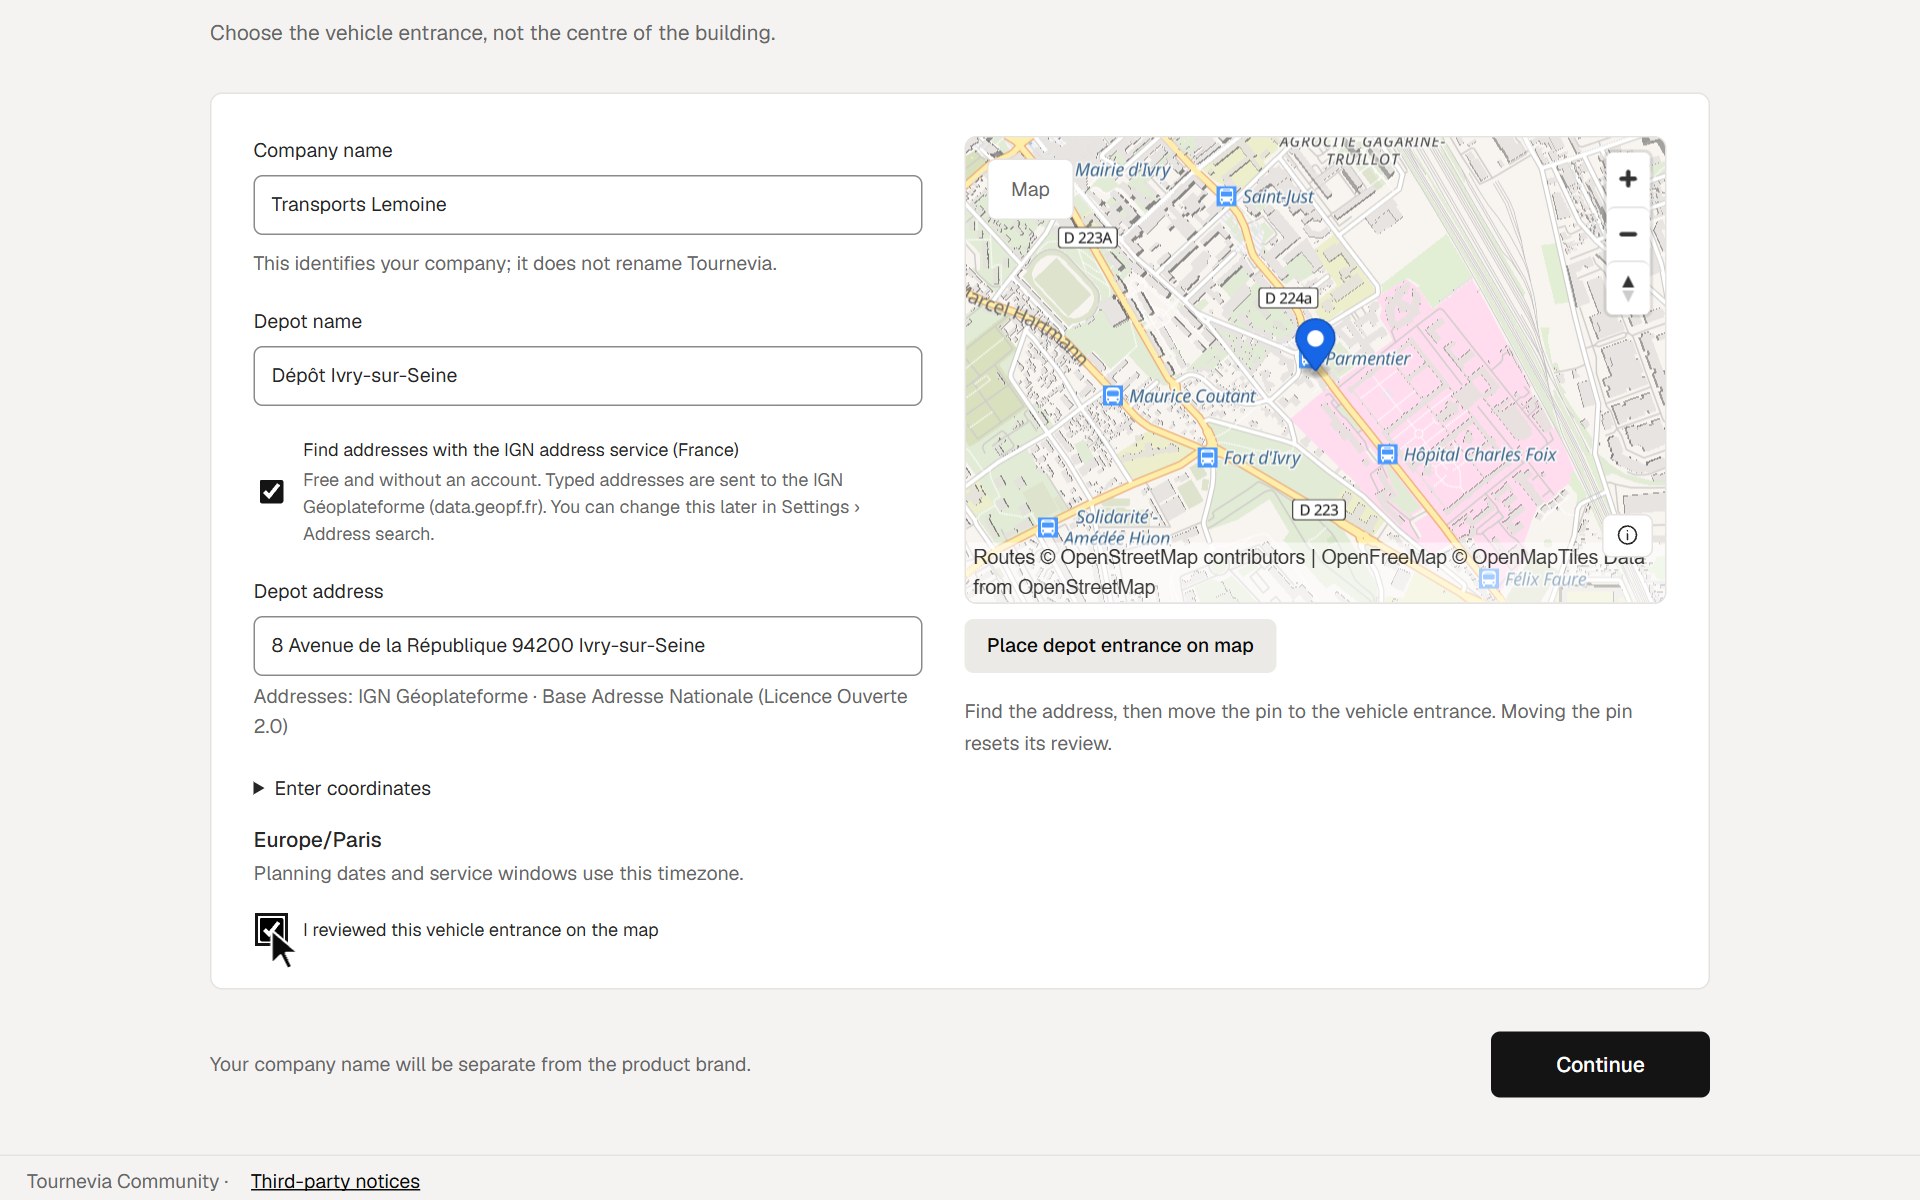
1. Company & depot
- Enter the Company name and the Depot name.
- If your installation has no address lookup of its own, the box Find addresses with the IGN address service (France) is offered. The service is free and needs no account; if you tick it, typed addresses are sent to the IGN Géoplateforme (data.geopf.fr). You can change this later in Settings → Address search.
- In Depot address, type the address and choose a suggestion: the pin is placed on the map. Without address lookup, open Enter coordinates and enter the latitude and longitude.
- An address points at the building, not always at the vehicle entrance: choose Place depot entrance on map, then click the entrance.
- Tick I reviewed this vehicle entrance on the map, then choose Continue. Moving the pin or changing the coordinates clears the review.
Planning dates and service windows use the Europe/Paris timezone.
2. Administrator
- Enter Your name, a Username and a Password of at least 15 characters, then Confirm password.
- The private setup link provides the authorization. Without the link, open Use a setup code instead and enter the Private setup code from the operator.
- Choose Create workspace.
This administrator manages users, depots and company settings. The setup guide opens next.
Follow the setup guide
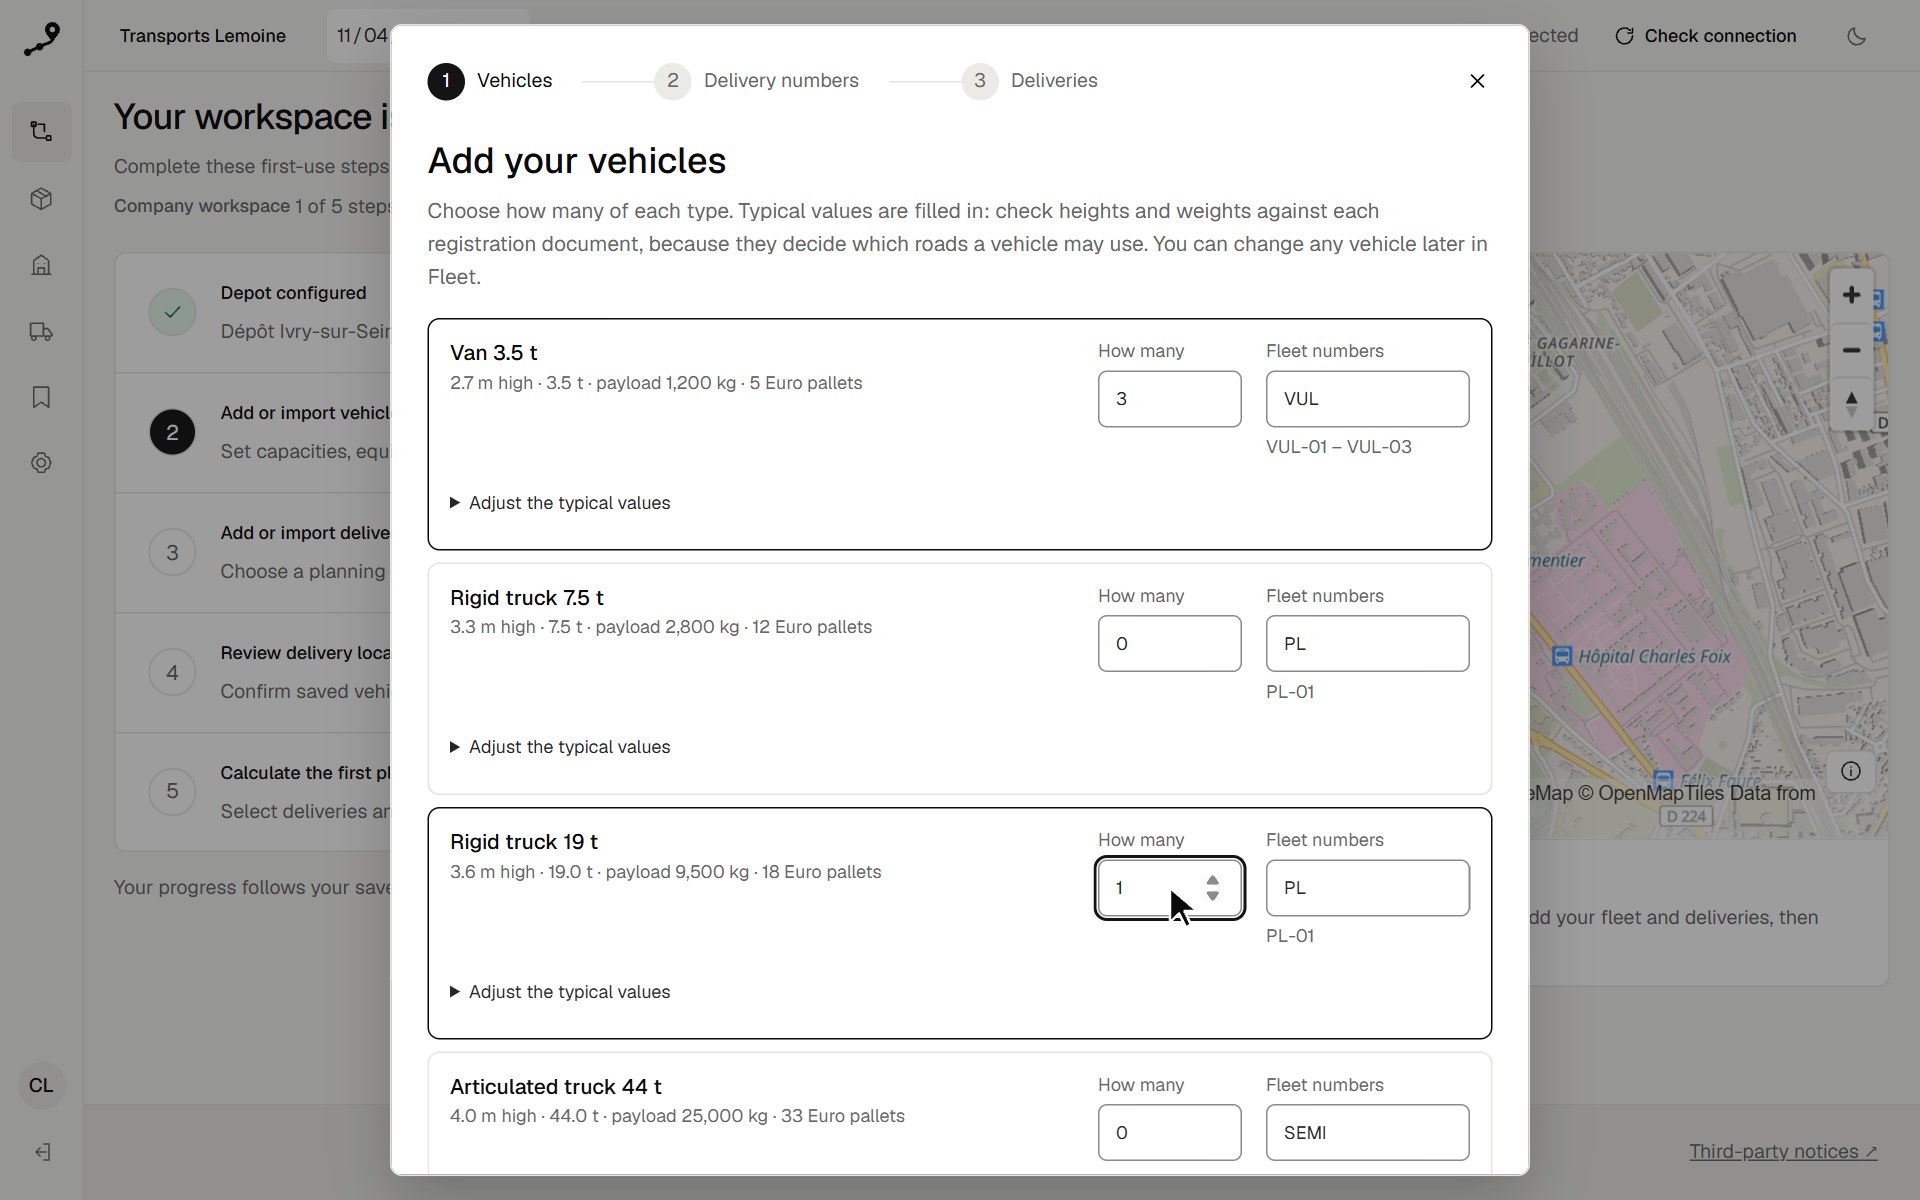
Once the workspace exists, a three-step guide takes the administrator through Vehicles, Delivery numbers and Deliveries. Every step offers Skip for now. The Close the guide cross stops it, and Tournevia says where each setting lives. While the fleet is empty and the date shown has no deliveries, the first-use checklist in Planning offers Open the setup guide. Planners do not see the guide.
Vehicles
- For each type — Van 3.5 t, Rigid truck 7.5 t, Rigid truck 19 t, Articulated truck 44 t — enter How many vehicles to add.
- Check the typical values filled in (height, gross weight, payload, Euro pallets) against each vehicle’s registration document: they decide which roads it may use. Correct them under Adjust the typical values.
- In Fleet numbers, keep or change the prefix:
VULgives VUL-01, VUL-02…, skipping numbers already in use. - Set the Working hours, Monday to Friday, then choose Add … vehicles.
If one vehicle is refused, those already added stay and only the rest remain to add. Import a vehicle file instead opens the fleet CSV import. Vehicles from the guide have no equipment, rates or limits: complete them, with their days off and where they start, in Fleet.
Delivery numbers
This step is the Delivery numbers setting described in Deliveries and coordinates. Save and continue saves it and moves to the last step.
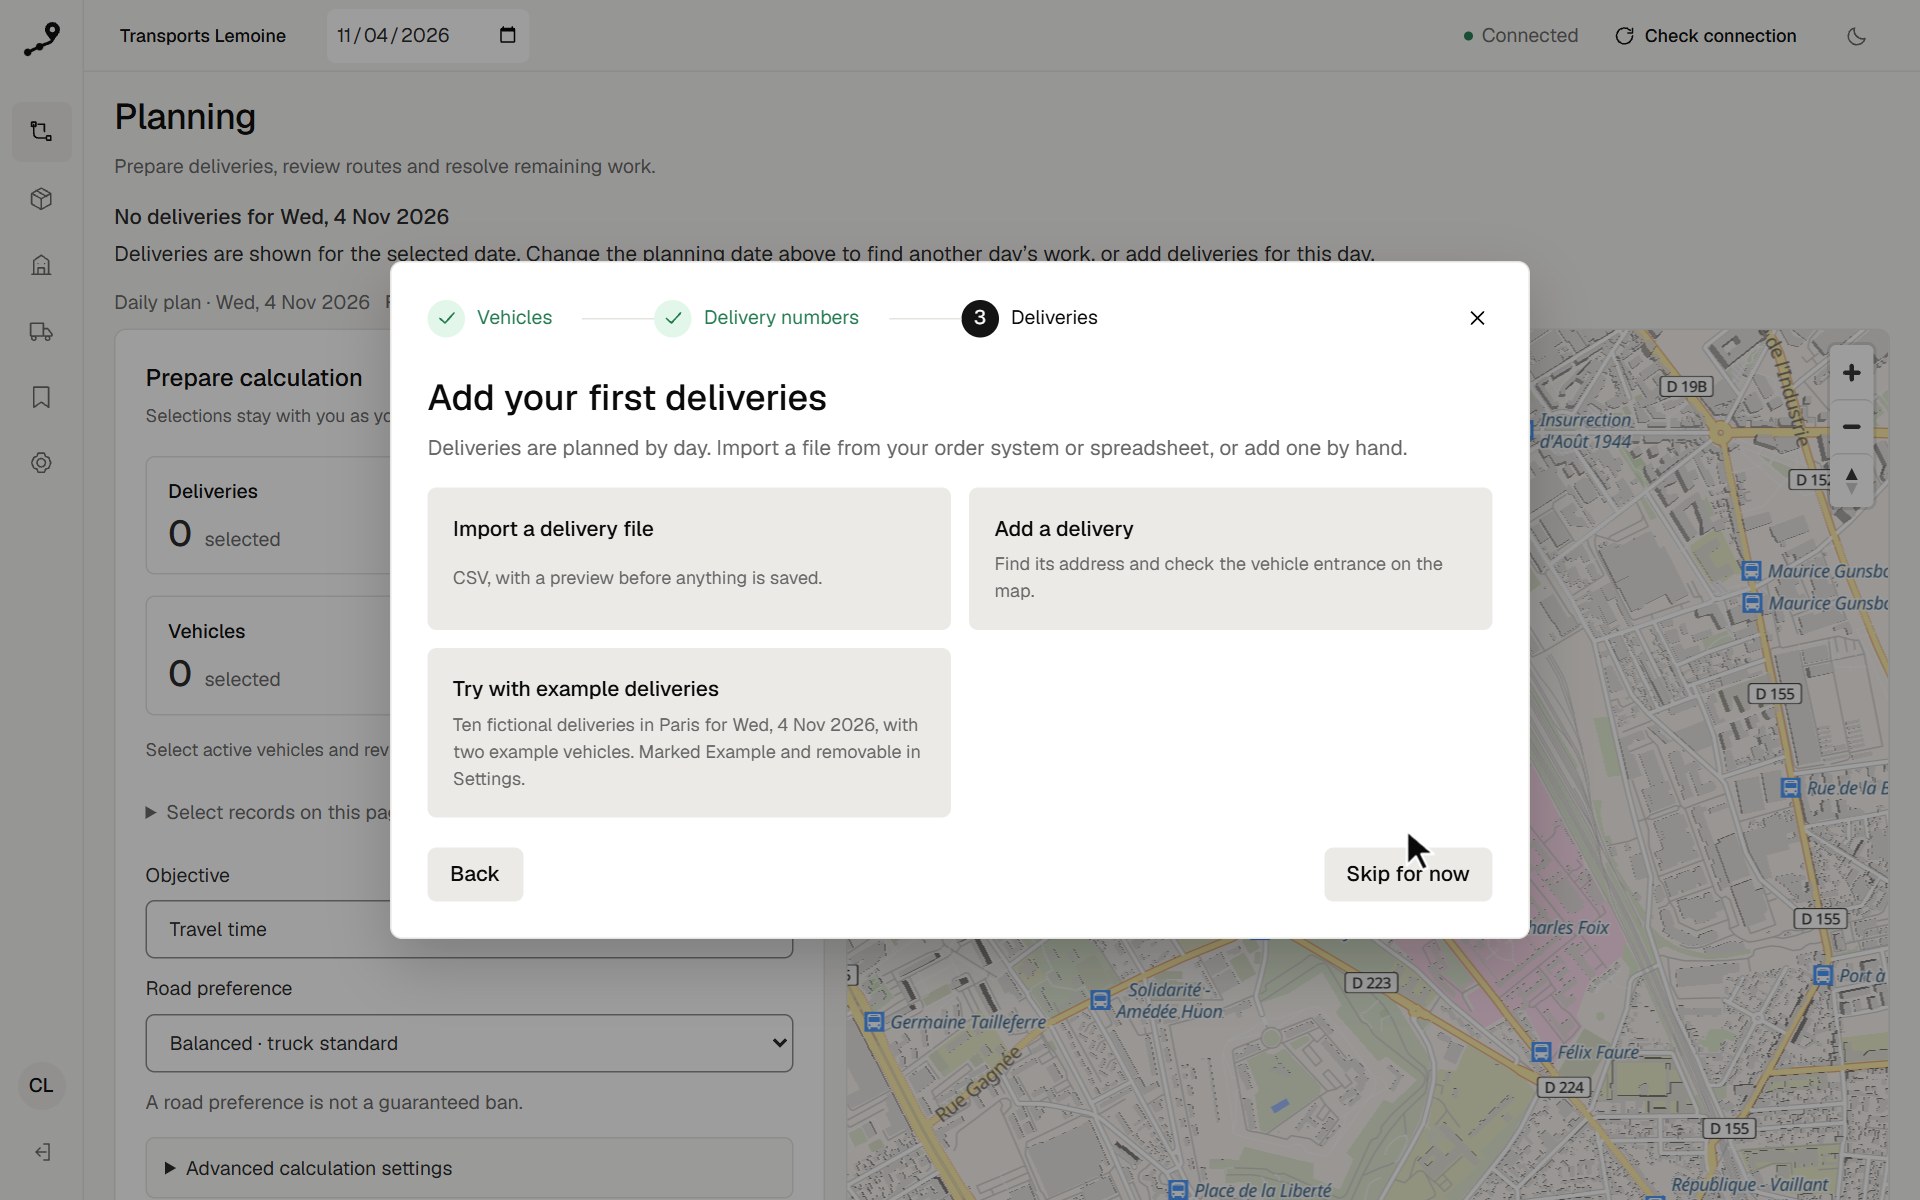
Deliveries
Three choices are offered:
- Import a delivery file: a CSV, with a preview before anything is saved.
- Add a delivery: find its address and check the vehicle entrance on the map.
- Try with example deliveries: see the next section.
Watch the setup flow
This walkthrough shows both setup steps, then the guide’s Vehicles and Deliveries steps. The company and its data are fictional.
Try with examples
Examples are fictional records added to your company’s own workspace to try planning: ten deliveries in Paris for a chosen day and, if they do not exist yet, an example depot in Paris and two example vehicles starting there. Their points are already reviewed, so you can plan them at once.
- Each example record carries an Example badge in the lists. While any exist, the notice Example data is in this workspace. stays on screen; administrators find Manage example data there.
- A calculation takes either only examples or only your own records. Select all reviewed deliveries for this day and Select all active vehicles keep to one of the two.
- A plan of examples is calculated on the road network and can be marked Ready, but its deliveries are fictional: its route sheets and CSV file say “Example data, not for driving.”
- Your own vehicles and deliveries cannot use the example depot, and it cannot become the main depot.
In Settings → Example data, an administrator can:
- choose the Day of the example deliveries, then Add example deliveries to try another day. A day that already has its examples is refused;
- choose Remove example data and confirm. Every example depot, vehicle and delivery is deleted, with the plans of example vehicles; your own records stay. Removal is refused while a calculation is waiting or running.
Choose your language
Before you sign in, the selector at the top of the sign-in or setup page changes the language of those screens. Once signed in:
- Open Settings → Personal preferences.
- In Interface language, choose English or Français.
- Choose Save language and wait for Language saved.
- Your account uses this choice on all your devices.
Addresses and instructions entered by your company are not translated, nor are equipment codes other than the tail lift and the refrigerated body. Where the map data has them, the map shows place and street names in the interface language.
Choose the appearance
The sun or moon button in the top bar, also on the sign-in page, switches between the light and dark themes. To follow the device setting again:
- Open Settings → Personal preferences.
- Under Appearance, choose Match this device, Light or Dark.
The change applies at once and is saved in this browser only; your account is not changed. The map keeps its light style.
Work in the editors
Deliveries, vehicles, customers, depots and places open in an editor. It closes from the cross in its corner and saves from the bar at its foot. On a phone, every editor opens full screen.
Before discarding unsaved changes or deleting a record, Tournevia asks in its own dialog, for example Discard unsaved record changes? The safe answer has focus; Escape or a click outside the dialog declines.
Change your password
- Open Settings → Personal preferences.
- Under Password, enter your Current password, then a New password of at least 15 characters and Confirm new password.
- Choose Change password.
You stay signed in here; your other signed-in devices are signed out. Repeated wrong current passwords count toward the sign-in limits.
Prepare your first day
- In Fleet, add your vehicles, or let the guide do it, then check their hours and where they start.
- In Deliveries, choose the planning date, then add or import the deliveries.
- Review the vehicle entrance of each delivery.
- In Planning, select deliveries and vehicles, then prepare the calculation.
Deliveries and plans belong to a date; the fleet, customers, depots and places are shared across dates. An empty list does not mean another day’s records were deleted. Changing the date clears selections, not saved records.
Manage access
In Settings, only administrators see Depots and places, Delivery numbers, Address search, Calculation, Example data and Users. Calculation holds the safety margin new calculations keep before each delivery window ends, 15 minutes by default (see Calculate, edit and export). Planners use their Personal preferences. If you forget your password, ask an administrator to set a new one. An administrator who cannot sign in needs another administrator or the installation operator.
After several wrong passwords, sign-in is limited for a while for that username from the same device, then for the username everywhere: wait, then try again.
Add or update a colleague
- As an administrator, open Settings → Users.
- Choose Add user, or Edit user on an existing row.
- Enter the requested account details and choose the role that matches their responsibilities: Planner or Administrator.
- Save, then share access instructions privately through your company’s usual process.
Usernames start with a letter or digit and use only letters, digits and . _ @ + -; they are case-insensitive and unique in the installation. Passwords have 15 to 128 characters.
In Edit user an administrator changes the display name or role, chooses Disable (after confirming) or Enable, and sets a new password with New password for … and Set password for …. Each of these changes ends that user’s sessions. You cannot disable, demote or reset your own account this way, and a company always keeps at least one active administrator.
There are no email invitations or self-service password-recovery emails.
Manage depots and places
Every vehicle starts and ends its day at a depot or a place. As an administrator, open Settings → Depots and places: the list and the map show each depot and place, its address and the state of its entrance. On the map, a warehouse marks a depot and a flag marks a place, beside its code.
- Add depot: somewhere goods are loaded. Vehicles can start there and deliveries can ship from there.
- Add place: another spot where a vehicle starts or ends its day, such as a driver’s home. A vehicle starting there leaves already loaded; no delivery can ship from a place.
- The Main depot is where vehicles start and end unless another choice is made. Make main gives that role to another depot.
- Delete removes a depot or place after confirmation. The main depot cannot be deleted, nor can a depot or place a vehicle or delivery still names; saved plans keep their own copy.
Place and review an entrance
- Choose Edit on the row, or the pin on the map.
- In Depot address, type the address and choose a suggestion, or choose Pick on map and click the vehicle entrance.
- Choose Save depot.
- Inspect the saved point, tick I reviewed this vehicle entrance on the map and choose Save depot again.
A calculation is refused, naming them, until the entrance of every depot and place its vehicles use is reviewed. If an existing plan depends on a changed entrance, prepare a new calculation. Where each vehicle starts and ends is chosen in Fleet and constraints.