Deliveries and coordinates
Add deliveries, check quantities and confirm vehicle entrances.
1. Add a delivery from its address
- Open Deliveries and check the Planning date at the top.
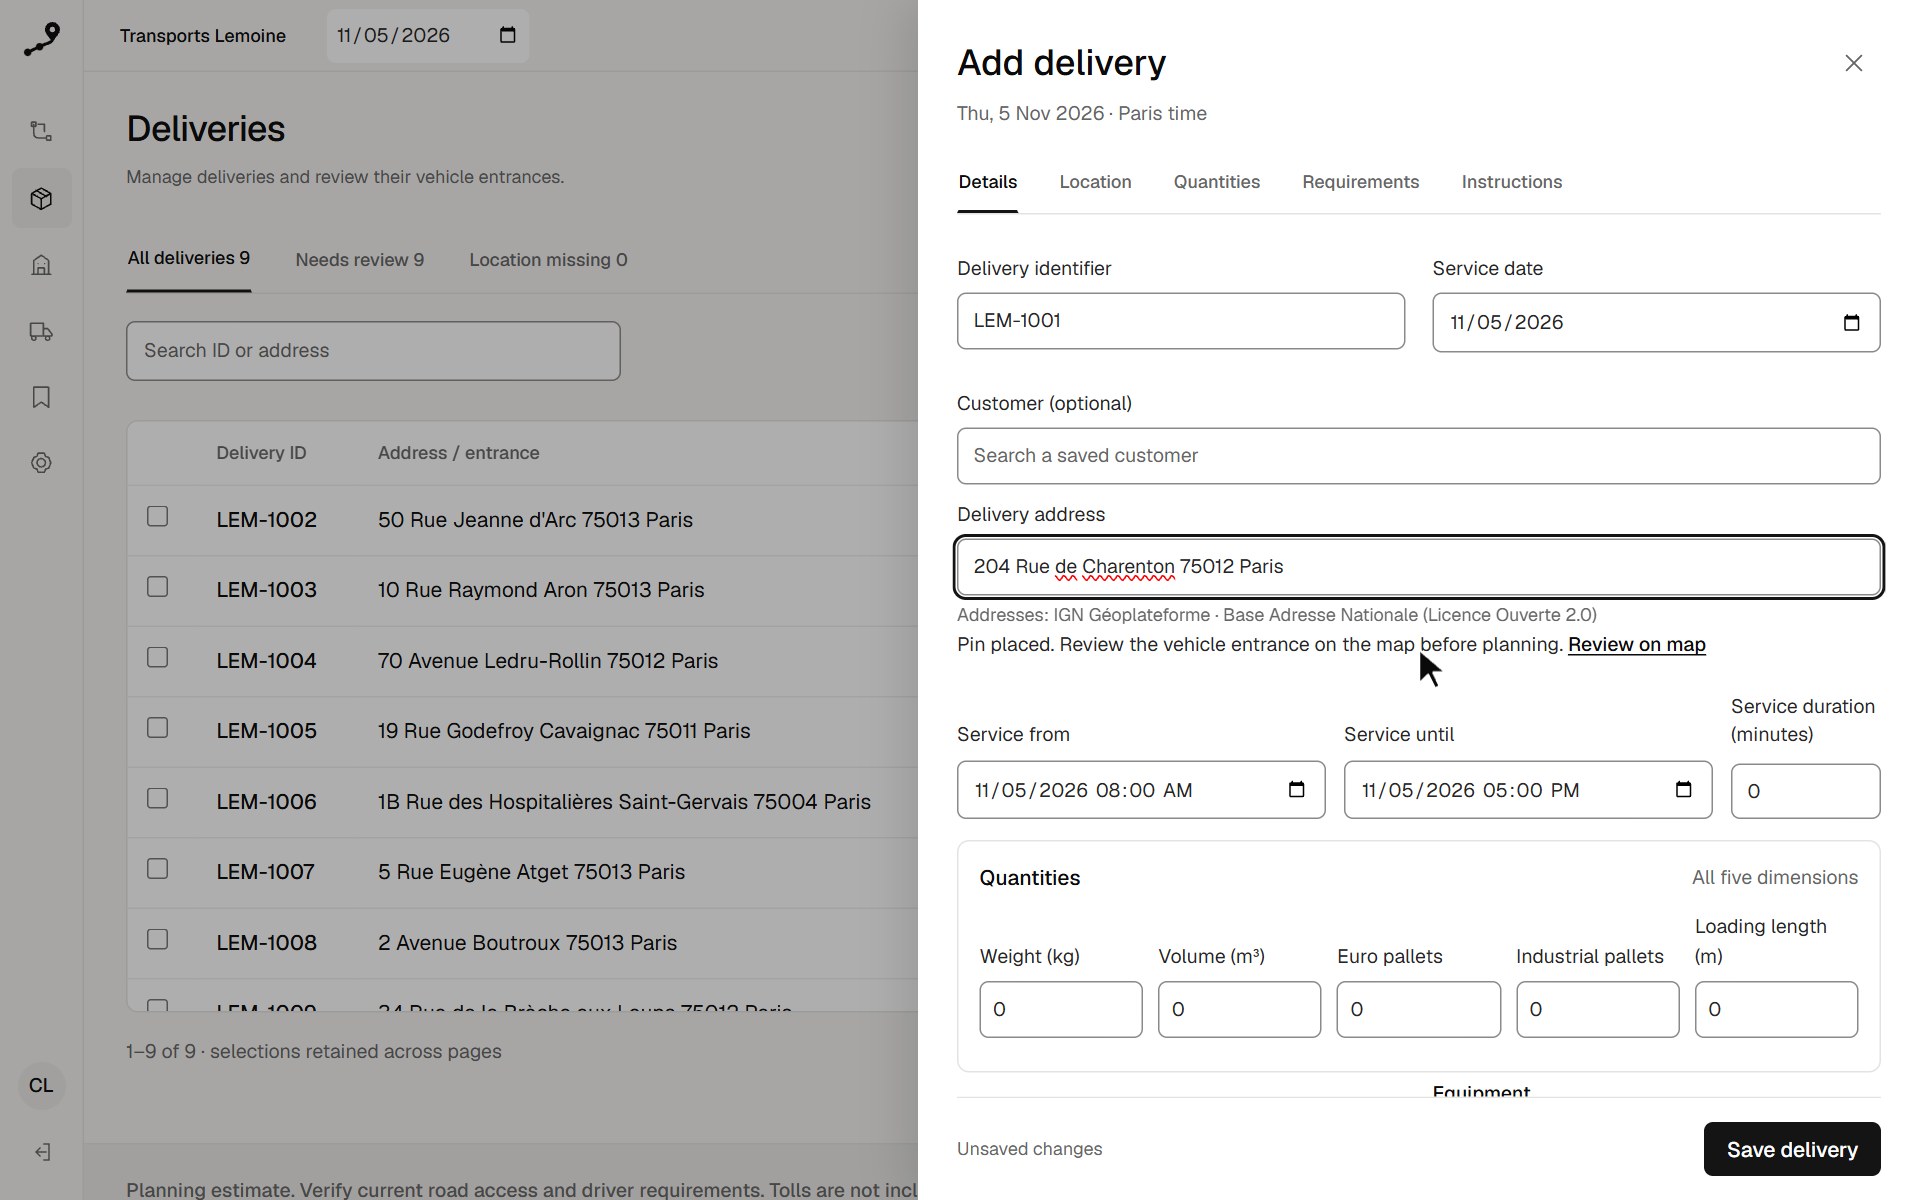
- Choose Add delivery. If your company numbers its deliveries, Delivery identifier already shows the next number (section 3); otherwise, enter an identifier.
- If the delivery is for a saved customer, search for it in Customer (optional) (section 4).
- In Delivery address, type the address and choose a suggestion: the address is filled in and the pin is placed on the building.
- Enter Service from, Service until and the Service duration (minutes), then the quantities.
- Choose Save delivery, then review the vehicle entrance (section 5).
Suggestions appear from three characters; those near the depot come first. Each shows its kind (Address, Street, Locality or Town) and a match percentage. Under the address, a line says whether the delivery has a pin and whether its entrance is reviewed, with Review on map. Coordinates remain available under Enter coordinates on the Location tab.
2. Turn on address search
Without address search, the editor says Address search is off for this workspace. An administrator can turn it on in Settings. The address is then plain text: place the pin on the map or enter coordinates.
- The installation’s own lookup. If the operator has installed a geocoder of its own, it is always used and addresses do not leave the installation. Settings → Address search says so, with nothing to choose.
- IGN’s address service. Otherwise, address search is off until an administrator ticks Use the IGN address service (France) in Settings → Address search, then chooses Save address search. This free service, without an account, receives the addresses typed into an address field and imported addresses without coordinates, with the depot’s position so that nearby addresses come first. Nothing else is sent to it.
The address source is shown under the field. With address search on, an import also places deliveries that have an address but no coordinates. A found address points at a house number, a street, a locality or a town, never at the vehicle entrance itself: the point still needs review.
3. Number new deliveries
As an administrator, open Settings → Delivery numbers:
- Tick Number new deliveries automatically.
- Build the format: Text before the number, Date part (No date, Year (2026), Year and month (202611) or Delivery date (20261103)), Between date and number, Digits and Start from, to continue an earlier system’s numbering.
- Check Next delivery today, then choose Save delivery numbers.
For example, LIV-, the year, a hyphen and four digits give LIV-2026-0001. The page proposes a format from the shape of existing identifiers. The next number follows the highest existing identifier in this format and is at least the starting number, so hand-typed and imported numbers move it on. The date part comes from the delivery date; with one, numbering starts again each year, month or day.
The add form proposes the next number; the final number is given when the delivery is saved, so two people adding deliveries at the same time never receive the same one. An identifier you type is kept as typed. In a CSV, a row with an empty external_id receives the next number, marked New number in the preview. Existing identifiers never change.
4. Reuse a saved customer
A customer keeps one reviewed entrance; its later deliveries reuse it without a new review. The Customers page lists them with their code, name, address, entrance state and usual hours. The tabs All customers, Needs review and No entrance and the search by code, name or address help you find them.
Save a customer from a delivery. Once the delivery’s entrance is reviewed and saved, open Save as customer… on the Location tab, enter the Customer code and Customer name, then choose Save customer. The customer takes the delivery’s address, reviewed entrance, service window as usual hours, service duration, equipment and instructions, and the delivery is linked to it.
Add a customer. In Customers, choose Add customer, enter its code and name, find the Customer address, and tick Fill new deliveries with usual hours if needed. Save, then review its entrance as for a delivery (section 5).
Use it on a delivery. In Customer (optional), search for the customer and choose it. The address, reviewed entrance, usual hours on the delivery’s own day, service duration, equipment and instructions are filled in, and the editor says the entrance is the customer’s. Unlink customer removes the link. Only a delivery at exactly the customer’s reviewed entrance is reviewed by it: if you move its pin, that point needs review.
On import, a customer column can name a saved customer, and a row without coordinates whose address is exactly an active customer’s is linked to it; see CSV formats.
5. Confirm the vehicle entrance
Calculation requires saved and reviewed latitude and longitude. No altitude is required.
- Choose Review on map under the address, the Location tab, or the location-status button in the list (Needs review, Location missing).
- Choose Pick on map and click the vehicle-accessible entrance. With address search, you can also look the address up there. Enter coordinates lets you type latitude and longitude, and Remove the point removes the pin (Remove the reviewed point once its entrance is reviewed).
- Choose Save location. The editor stays on the Location tab.
- Inspect the saved point, tick I reviewed this vehicle entrance on the map and choose Confirm reviewed entrance.
Moving the pin resets the review, and a moved pin must be saved before it can be reviewed. Back to details returns to the other tabs.
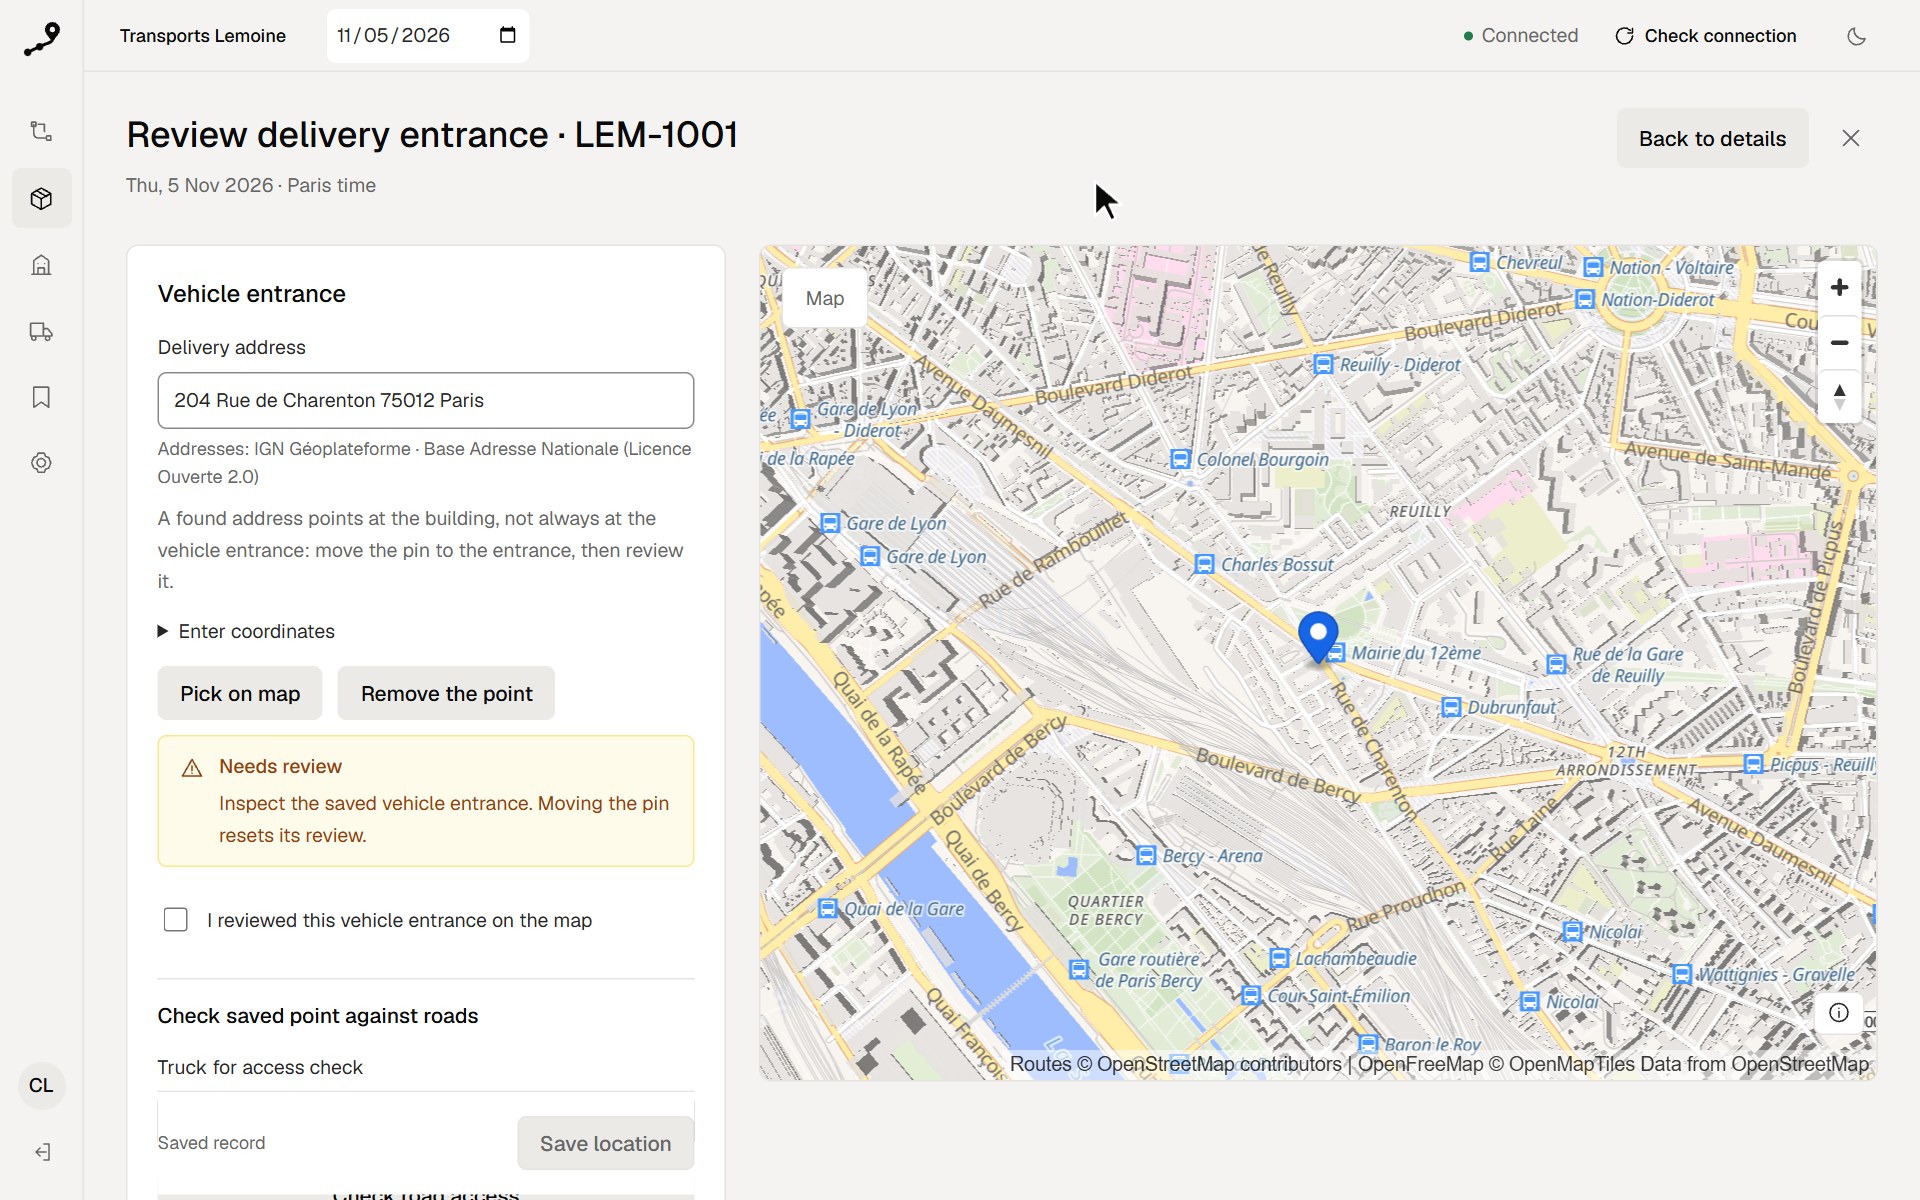
Check road access, with a Truck for access check, looks for a road connection within 50 m of the saved point, using that truck’s dimensions, weight and axles. Save your changes first. It is complementary: finding a route does not establish that the entrance is correct. If no road usable by the compatible trucks lies within 50 m of the pin, the calculation leaves the delivery unassigned and says so; move the pin to the vehicle entrance and review it again.
Watch a delivery from address to entrance
This walkthrough adds a delivery by its address, saves it, then reviews its entrance on the Location tab. Its data is fictional; use the values for your operation.
6. Check times, quantities and requirements
The editor has five tabs: Details, Location, Quantities, Requirements and Instructions. Details gathers everything except the location.
- Enter a service window whose end follows its start, and a service duration.
- In Quantities, enter the load and check its units.
- In Requirements, add the Priority (0–100) and, under Equipment, tick what the delivery needs: Tail lift or Refrigerated body.
- Add Delivery instructions if needed, then Save delivery.
New calculations aim to start each delivery at least a safety margin before its window ends: 15 minutes unless an administrator changes it. See Calculate, edit and export.
Quantities contains five dimensions: weight, volume, Euro pallets, industrial pallets and loading length. Zero is an actual quantity, not a request to ignore a constraint.
Other equipment, such as a code brought by a file, goes in Other equipment codes (separate with |). These codes are written in capitals as you type: spaces and hyphens become underscores, and empty or repeated codes are dropped when saving. A code that cannot be used — for example one starting with a digit — is named under the field. Files and the API keep the codes: TAIL_LIFT for the tail lift, REFRIGERATED for the refrigerated body. If a value is missing or out of range, the editor lists the fields that need attention and opens the tab of the first one; your edits stay in place.
When your company has several depots, Requirements also offers Ships from: the depot the delivery is loaded at, or Any depot. Only vehicles that start at that depot carry it. With more than one depot or place, the deliveries list has a Ships from column: the depot’s name, or Any vehicle when the delivery names none.
7. Import or re-import a file
- In Deliveries, choose Import CSV. Drop your file on the area marked Drop the deliveries CSV file here, or click it to choose the file, then choose Preview CSV. Nothing is saved at this stage.
- Read the preview. Each row is New, Changed — with what it changes, for example “Service duration · Service window” — or Unchanged.
- If there are errors, correct the source file, choose it again and preview until no errors remain.
- Choose Import deliveries.
- Review the imported points and Place the missing points open the matching delivery list.
Under Delivery points, the preview counts where each point comes from: a saved customer, the file, the address (with its match percentage) or nowhere. Rows to check give their reason, and Only rows to check shows them alone: a past service date, an address not found, only the town or a place found, an uncertain match, latitude and longitude that look swapped, a point more than 100 km from the depot, the same address with another point elsewhere in the file, or a point more than 50 m from its customer’s entrance. These warnings never block the import. Only a saved customer’s reviewed entrance arrives reviewed: check every other entrance on the map before planning.
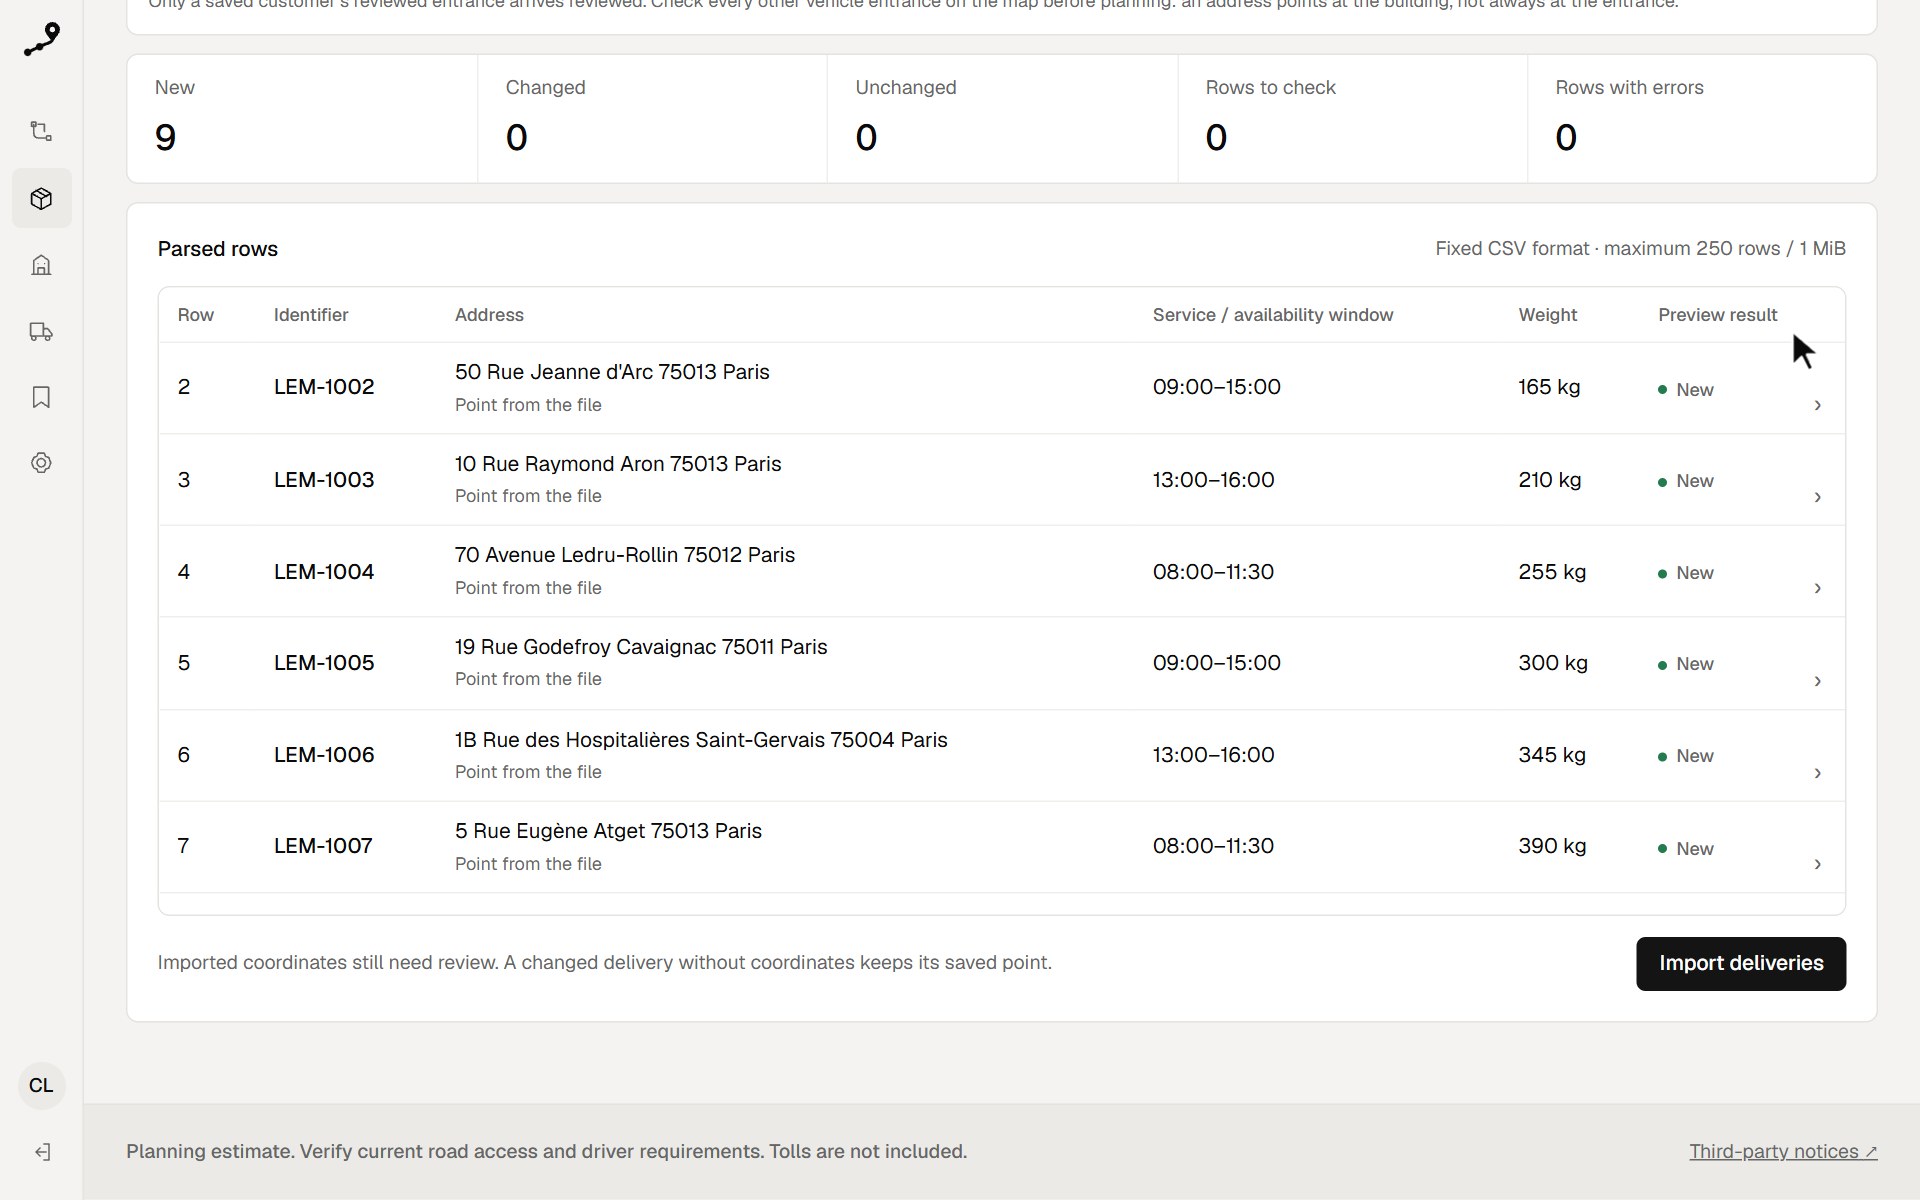
Re-import a corrected file. Existing deliveries change only after Import deliveries. A changed delivery without coordinates keeps its saved point and its review (Saved point kept). The same point given again keeps its review; a moved point must be reviewed again. A file without the optional priority, customer or ships_from columns keeps the saved values.
CSV uses UTF-8, commas and fixed headers, at most 250 data rows and 1 MiB. Before a file is chosen, Columns of the file shows the exact header row, with Copy the header row and Download the template; CSV formats lists every column with its unit. Keep technical column names unchanged in French files.
The walkthrough chooses a delivery file, reads the preview, then imports. Its data is fictional.
8. Cancel, restore or delete deliveries
Tick the deliveries concerned: the selection bar offers Cancel deliveries, Delete deliveries and Clear selection. Each action asks for confirmation.
- Cancel deliveries: they stay in the list, inactive, and are not planned. A cancelled delivery shows Restore on its row.
- Delete deliveries: they are removed for good. To keep a delivery for later, cancel it instead. A cancelled delivery can no longer be ticked: delete it from its editor with Delete delivery.
Saved plans keep their own copy and then ask for a fresh calculation. The action is refused while a waiting or running calculation uses the delivery, or if the delivery changed since it was shown: reload the list and try again.
9. Find deliveries
The tabs All deliveries, Needs review and Location missing count the whole day, not only the page on screen; when the day has cancelled deliveries, an Inactive deliveries tab lists them. The search box finds an identifier or address across the whole day. An empty tab says what that means, for example Every located delivery is reviewed. Deliveries are listed in identifier order, 50 per page; the footer shows the range, the total and the page count.
Example deliveries carry an Example badge; see Getting started.
10. Select work for planning
- Check individual rows, Select this page (N) for the active records shown, or Select all reviewed deliveries for this day.
- Continue to other pages if needed; selection survives pagination.
- Open Planning and check the selected total before calculating.
One calculation takes at most 250 deliveries. When a page selection would pass that limit, the screen says so instead of truncating it. Examples are planned only with other examples: when the day has both, Select all reviewed deliveries for this day leaves the examples out, unless the selected vehicles are examples, and says so.