Fleet and constraints
Add a vehicle, check its capacities and select the fleet for the day.
1. Open the vehicle
- Open Fleet, then Add vehicle or Edit on an existing row.
- Enter a recognizable Fleet number, such as the one used by your company.
- Check Active to make the vehicle available for calculation selection.
Fleet records are shared across dates. A vehicle works by its weekly hours and days off (section 3).
Start from a common vehicle type
During first-use setup, the guide adds several vehicles of a type at once (see Getting started). It fills in these typical values:
| Type | Height | Gross weight | Payload | Euro pallets | Prefix |
|---|---|---|---|---|---|
| Van 3.5 t | 2.7 m | 3.5 t | 1,200 kg | 5 | VUL |
| Rigid truck 7.5 t | 3.3 m | 7.5 t | 2,800 kg | 12 | PL |
| Rigid truck 19 t | 3.6 m | 19 t | 9,500 kg | 18 | PL |
| Articulated truck 44 t | 4.0 m | 44 t | 25,000 kg | 33 | SEMI |
These are starting points, not your vehicles’ specifications. The guide also fills in width, length, axle load, volume and loading length: check every value against the registration document in the editor, then add equipment, rates, days off and the start place where needed.
2. Enter capacities and road constraints
- Under Payload capacities, enter weight, volume, Euro pallets, industrial pallets and loading length.
- Under Road-routing constraints, enter height, width, length, gross routing weight, axle load and axle count.
- Use the real vehicle specifications. Payload describes the goods; gross weight is used for road restrictions.
Zero is a real capacity, not a way to disable a constraint. Do not replace an unknown value with an invented one. The fields accept only the ranges the routing engine supports, for example a height of at most 10 m and 2 to 12 axles.
3. Set the week and days off
- Under Working hours and equipment, in Weekly hours, tick each working day and enter its start and end time. An unticked day shows Does not work.
- Use Monday’s hours from Tuesday to Friday copies Monday’s hours to the rest of the week.
- Under Days off and other hours, choose Add a day off, then the date. Keep Day off, or choose Other hours for a date when the vehicle works different hours. Remove deletes a date.
A new vehicle starts with Monday to Friday, 08:00 to 17:00. Times are Paris local time. A day off or other hours replace the weekly hours on that date, and each date has only one exception. Overnight work is unsupported.
A calculation uses each vehicle’s hours on its own day; saved plans do not change. Around a clock change, work starts at the later and ends at the earlier possible instant, so a vehicle never works longer than declared.
4. Choose where it starts and ends
Under Start and end of the day:
- Starts at: the Main depot, chosen by default, another depot or a place such as a driver’s home.
- Ends at: Where it started, chosen by default, or another depot or place.
The vehicle leaves loaded from where it starts. A delivery whose Ships from is a depot goes only on a vehicle that starts there. The fleet list shows “Starts at … · ends at …”, with the places’ names, when a start or end is chosen.
An administrator can create a place without leaving the editor when address search is on: open Add another place…, enter the Place name and Place code, choose the Place address from the suggestions, then Add place. The vehicle then starts at that place. Review its entrance in Settings → Depots and places before calculating: a calculation is refused, naming them, until the entrance of every depot and place its vehicles use is reviewed. Depots and places are managed as described in Getting started.
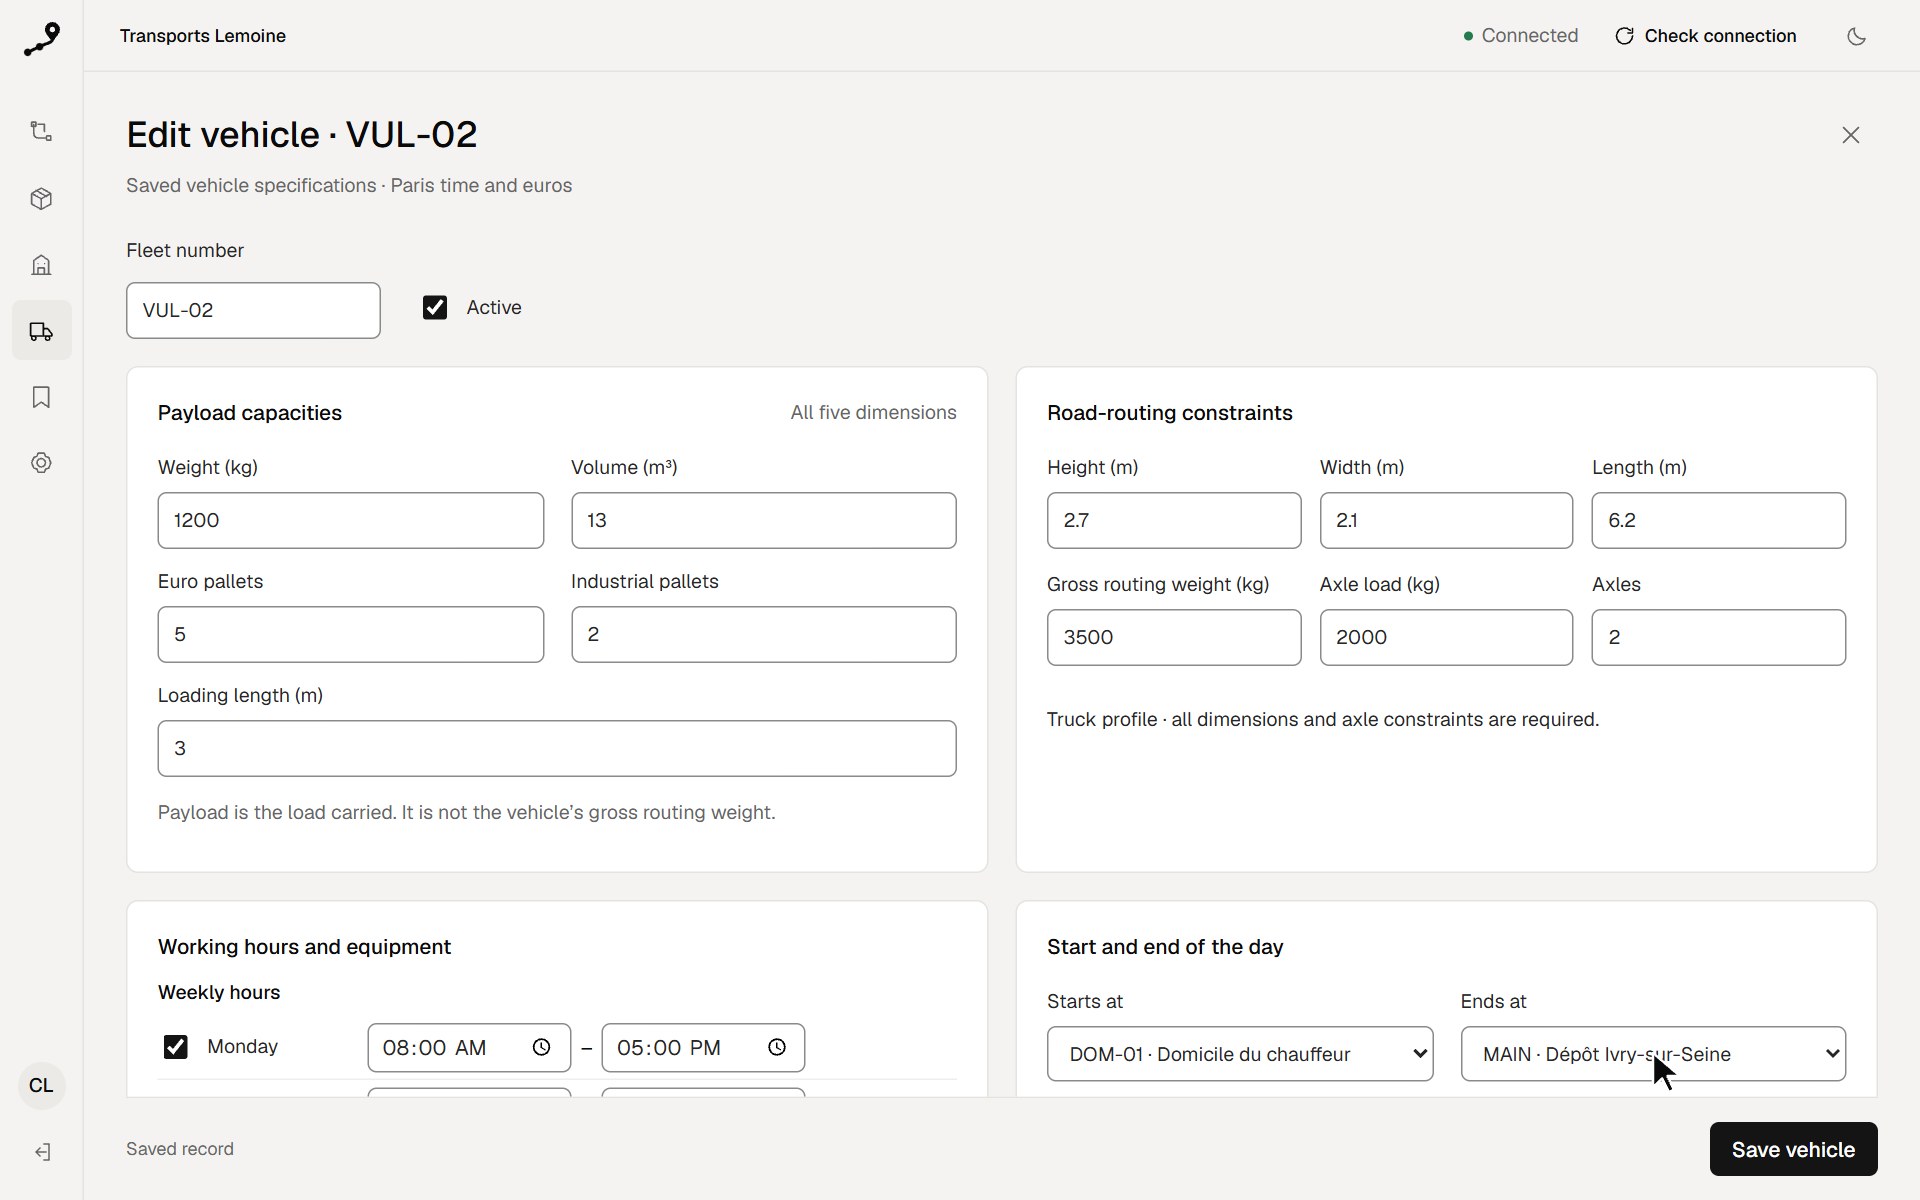
The walkthrough opens a vehicle, chooses where it starts and ends, then shows its week. Its data is fictional and not a recommendation for your operation.
5. Enter equipment, rates and limits
- Under Working hours and equipment, in Equipment, tick Tail lift, Refrigerated body or both, as the vehicle has them. Enter any other equipment in Other equipment codes (separate with |), such as
PALLET_JACK. The equipment must match the requirements on deliveries. Other codes are written in capitals as you type, spaces and hyphens become underscores, and empty or repeated codes are dropped when saving. Files and the API keep the codesTAIL_LIFTandREFRIGERATED. - Under Operating rates and route limits, enter the Distance rate (€ / km), Time rate (€ / hour) and Fixed cost (€) if you use costs.
- Add a Maximum distance (km), Maximum driving (minutes) or Maximum stops only when the limit applies. Leave an optional field blank to add no limit.
6. Save and select
- Choose Save vehicle. If a field is missing or out of range, the editor lists the fields that need attention; correct them.
- Verify the change was saved before closing the editor.
- Check the vehicle in the list — or use Select this page (N) or Select all active vehicles — then find your selection in Planning.
One calculation takes at most 25 vehicles. When a selection would pass that limit, the screen says so instead of truncating it. Example vehicles are planned only with example deliveries: Select all active vehicles keeps to one of the two. After a failed save, values remain in the form but have not been confirmed in the database. See troubleshooting.
7. See who does not work that day
Fleet has no date selector of its own: it uses the planning date chosen in Planning or Deliveries. An active vehicle that does not work that day carries an Off … badge with the date, and a notice above the list names those vehicles with the reason: a day off, or no hours on that weekday. Change their weekly hours or days off to plan them; the same notice appears in Planning for the selected vehicles.
8. Import vehicles from CSV
- In Fleet, choose Import CSV. Drop your file on the area marked Drop the vehicles CSV file here, or click it to choose the file, then choose Preview CSV. Nothing is saved at this stage.
- Read the preview: each row is New, Changed with what it changes, or Unchanged. Correct the source file until the preview shows no errors.
- Choose Import vehicles.
The vehicle file uses fixed headers, one column per weekday (monday … sunday, for example 07:30-17:00, or empty for a day it does not work), cents for rates, millimetres and kilograms for dimensions, and may end with the route limits, then start and end. Before a file is chosen, Columns of the file shows the exact header row, with Copy the header row and Download the template; CSV formats lists every column. A vehicle changed by an import keeps its days off, and a file without the optional columns keeps the saved limits, start and end.
9. Find vehicles
The tabs All vehicles, Active and Inactive count the whole fleet, not only the page on screen, and the search box finds a fleet number across the whole fleet. The figures above the list — Fleet vehicles, Active vehicles, Payload capacity across active vehicles, and Equipment — also cover the whole fleet, or the vehicles matching the search. Each row sums up the vehicle’s week, for example “Mon–Fri 08:00–17:00”, and example vehicles carry an Example badge. The Size and weight column gives the height, width and length, then the gross weight, axle load and number of axles, for example “H 3.6 · W 2.55 · L 9.6 m” then “19 t gross · 11.5 t per axle · 2 axles”. Equipment is shown by name, other codes as written. An empty tab says what that means, for example No inactive vehicles.
Use a single van
- Add the van with its real specifications and working hours.
- Select only that vehicle and the deliveries you need to serve.
- Leave equipment empty if deliveries require none, and optional limits blank when they do not apply.
- Calculate, then review unassigned deliveries before approval.
Parcel-count-only planning, disabling load dimensions and physical parcel packing are not available.
Understand costs and preferences
Displayed cost can include fixed, distance and elapsed-time costs. The modeled travel-cost objective concerns travel; tolls are not priced. Preferences to avoid tolls or motorways influence road choice without guaranteeing exclusion.
Next: calculate and review routes.