Calculate, edit and export
Prepare a calculation, review the routes, mark the plan Ready, print drivers’ route sheets and export the plan.
The walkthrough shows one day’s path: choose the day’s work, calculate, review and mark the plan Ready, then open the route sheets. It uses the actual interface with fictional data; playback duration is not calculation time.
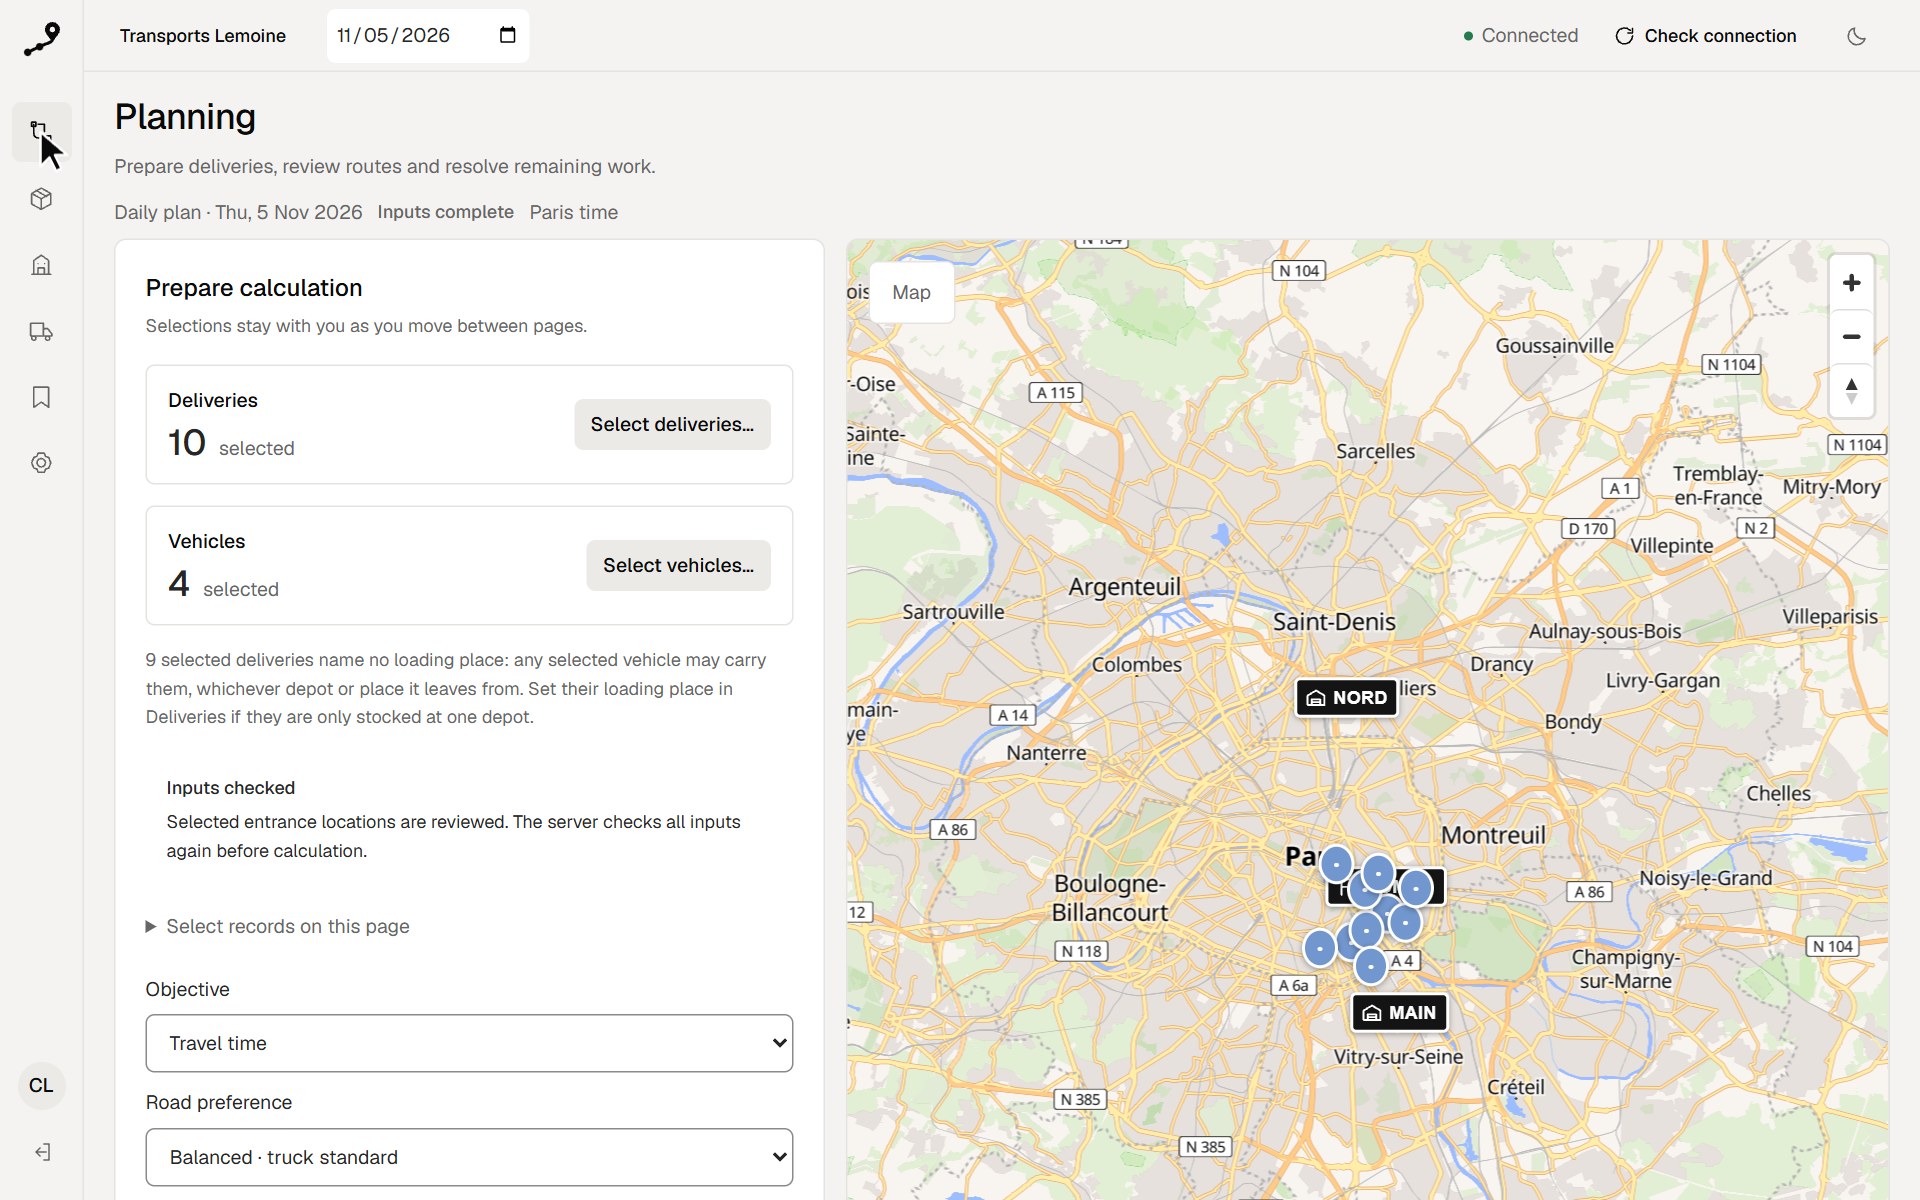
1. Prepare the calculation
- Open Planning and check the date (“Daily plan · …”).
- Choose Select deliveries…: the Deliveries page opens, where Select all reviewed deliveries for this day selects the active deliveries whose entrance is reviewed in one step. Do the same with Select vehicles… and Select all active vehicles in Fleet. You can also tick records under Select records on this page. Your selections stay with you from page to page; changing the date clears them.
- Resolve what is missing. When selected deliveries have a pin to review, Review locations opens Deliveries to check them. A notice names selected vehicles that do not work that day, with the reason (day off, or no hours on that weekday): change their weekly hours or days off in Fleet (Open Fleet). A calculation uses each vehicle’s hours for its day.
- Choose the Objective (Travel time or Modeled travel cost) and the Road preference (Balanced · truck standard, Prefer no tolls or Prefer no motorways), then Start new calculation. When nothing is missing, the status beside the date reads Inputs complete.
One calculation takes at most 250 deliveries, 25 vehicles, 3 truck profiles and 301 distinct points (250 for deliveries, the rest for depots and places). Its places — the main depot, the depots and places where vehicles start or end, and the deliveries — must lie within the installation’s distance limit (200 km apart by default). A selection outside these limits is refused before it starts; Concerned: then names the records involved (Depot stands for the main depot). “Prefer no tolls” is not a guaranteed exclusion. Advanced calculation settings holds the Solver budget (seconds), from 1 to 60 (5 by default). Times use Europe/Paris.
Depots, places and where deliveries ship from
A company can keep several depots and other places, such as a driver’s home. An administrator manages them in Settings › Depots and places.
- Where a vehicle starts: each vehicle leaves loaded from where it starts, Starts at. By default this is the Main depot, unless another depot or a place is chosen on the vehicle. It ends its day at Ends at, by default where it started.
- Where a delivery ships from: a delivery whose Ships from names a depot goes only on a vehicle that starts at that depot. With Any depot, any vehicle can carry it. If no selected vehicle starts at the named depot, the delivery stays unassigned with the reason No compatible vehicle. When the company has more than one depot or place, Deliveries shows each delivery’s Ships from, or Any vehicle.
- Deliveries that name no loading place: when the selected vehicles leave from different places, the form says how many selected deliveries name no loading place: any selected vehicle may carry them, whichever place it leaves from. Set their Ships from in Deliveries if they are only stocked at one depot.
- What the calculation checks: a calculation always includes the main depot, whose entrance must be reviewed, and every depot or place where a selected vehicle starts or ends. If one of these entrances is not reviewed, the calculation is refused and Concerned: names the codes involved: review them in Settings › Depots and places.
- Several depots in one plan: one plan can combine vehicles from several depots. To plan each depot separately, select only its vehicles and deliveries. Two Ready plans for the same day can coexist as long as they share no vehicle or delivery.
When a plan involves several depots or places, every route card says where its truck is loaded and where it ends, for example “Loaded at Dépôt Ivry-sur-Seine · returns there” or “Loaded at Domicile du chauffeur · ends at Dépôt Ivry-sur-Seine”. On the map, depots show a warehouse icon and other places a flag, each with its code.
Safety margin
Each new calculation keeps a safety margin before every window ends: each delivery is planned to start at least that long before its window ends, never before it opens, so a delay on the road does not make it late. The margin is 15 min by default; an administrator sets it from 0 to 120 min in Settings › Calculation (0 plans up to the last minute). When the roads allow no such time, the stop is planned later in its window and its margin shows less; validation still checks the real windows. A delivery that can only be reached in its last minutes may stay unassigned: lower the margin to plan it.
A plan keeps the margin it was calculated with, shown under Calculation details and routing dataset; a plan calculated with no margin, or before the setting existed, reads “None: planned up to the last minute”. Changing the setting affects only new calculations.
Examples and real records
Deliveries and vehicles marked Example are fictional. An administrator adds or removes them in Settings › Example data.
A calculation takes only examples or only your own records. The select-all actions keep to one kind and say so; a mixed selection is refused. A plan of examples carries the Example notice. It can be marked Ready so you can try the rest of the workflow, but its route sheets and CSV file say “Example data, not for driving.”: these are not routes to drive.
While the calculation runs
The screen shows the actual stage (Checking inputs, Calculating road travel times, Finding an assignment, Checking road routes, Validating constraints, Saving result), without an estimated percentage. A calculation can wait for an available worker.
- Cancel calculation stops it. Nothing is saved, and your deliveries and vehicles are unchanged.
- A company can have at most five calculations waiting or running. Cancel one or wait for one to finish before starting another.
- Calculation service needs attention means the calculation worker is not running or the routing service is unavailable. Calculations wait or fail until the operator restarts it.
2. Inspect the result
A successful calculation creates a Draft, not an automatically approved plan.
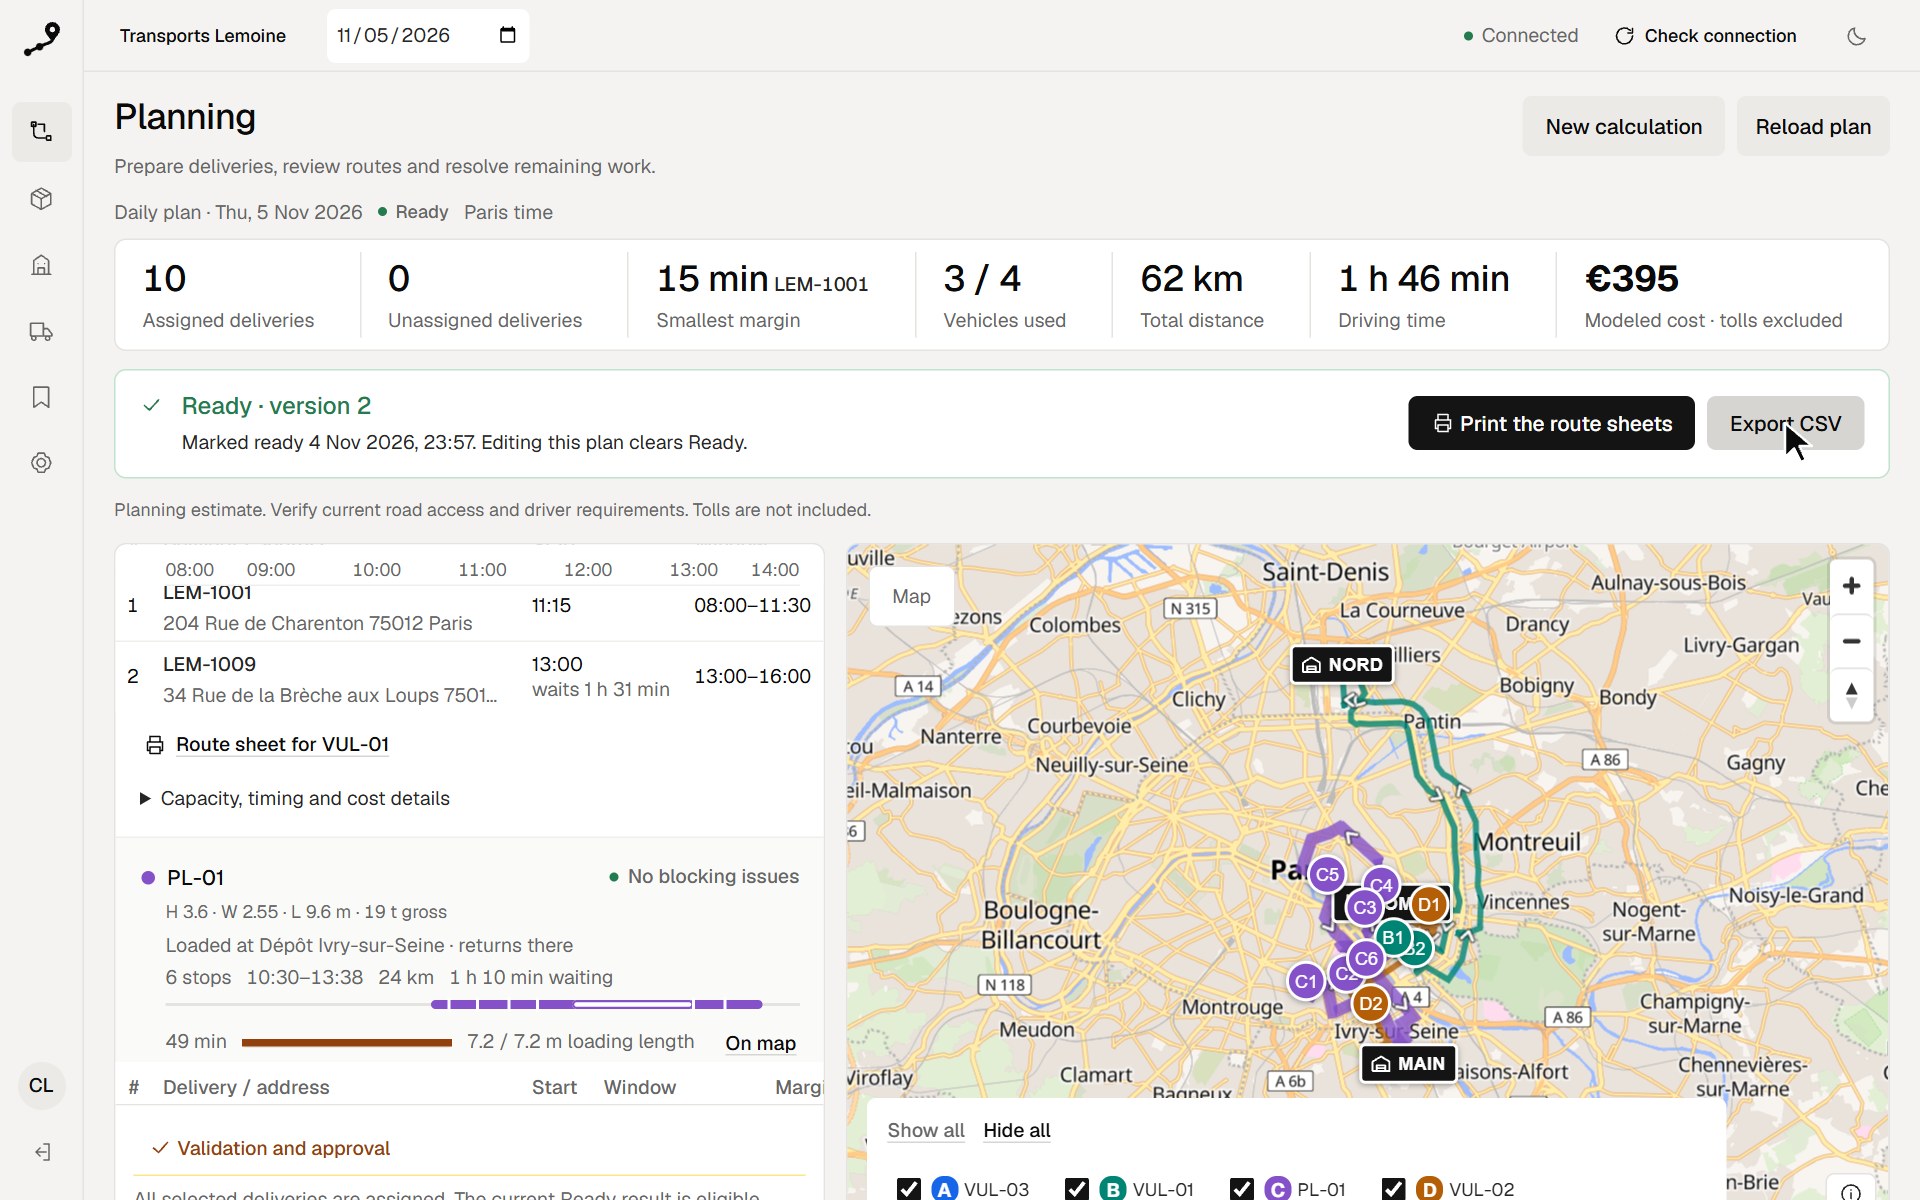
- Read the summary: Assigned deliveries, Unassigned deliveries, Smallest margin (the day’s smallest, with its stop), Vehicles used, Total distance, Driving time and Modeled cost · tolls excluded. The band under these figures states whether the plan can be approved (see section 4).
- Check each route card: the truck’s size and gross weight (for example “H 3.6 · W 2.55 · L 9.6 m · 19 t gross”), its stops, times, distance and total waiting, its day on the shared hour axis, its tightest load, and No blocking issues or Review issues. A vehicle without deliveries reads Not used.
- Expand View stops to check each stop’s Start, Window and Margin; View all stops shows a long route in full.
- Select a stop in the list or on the map to find it in the other.
- For a blocking issue, Inspect vehicle and stops opens the route or delivery concerned.
- Open Unassigned deliveries to see why work was left out. When route limits were reached, a note names them: raise or remove them in Fleet, then recalculate. When the plan was calculated with a safety margin, a note says that a delivery reachable only later than that stays unassigned: an administrator can lower the margin in Settings › Calculation, then start a new calculation.
The Margin is how much later the truck could arrive at the stop and still start within its window, on estimated travel times without live traffic. A margin of 10 min or less is marked with a clock in amber, and the band under the figures names those stops. A tight plan stays valid: you decide. When the truck waits for a window to open, the wait shows under the stop’s start time (“waits 1 h 31 min”), and the day strip draws it hollow.
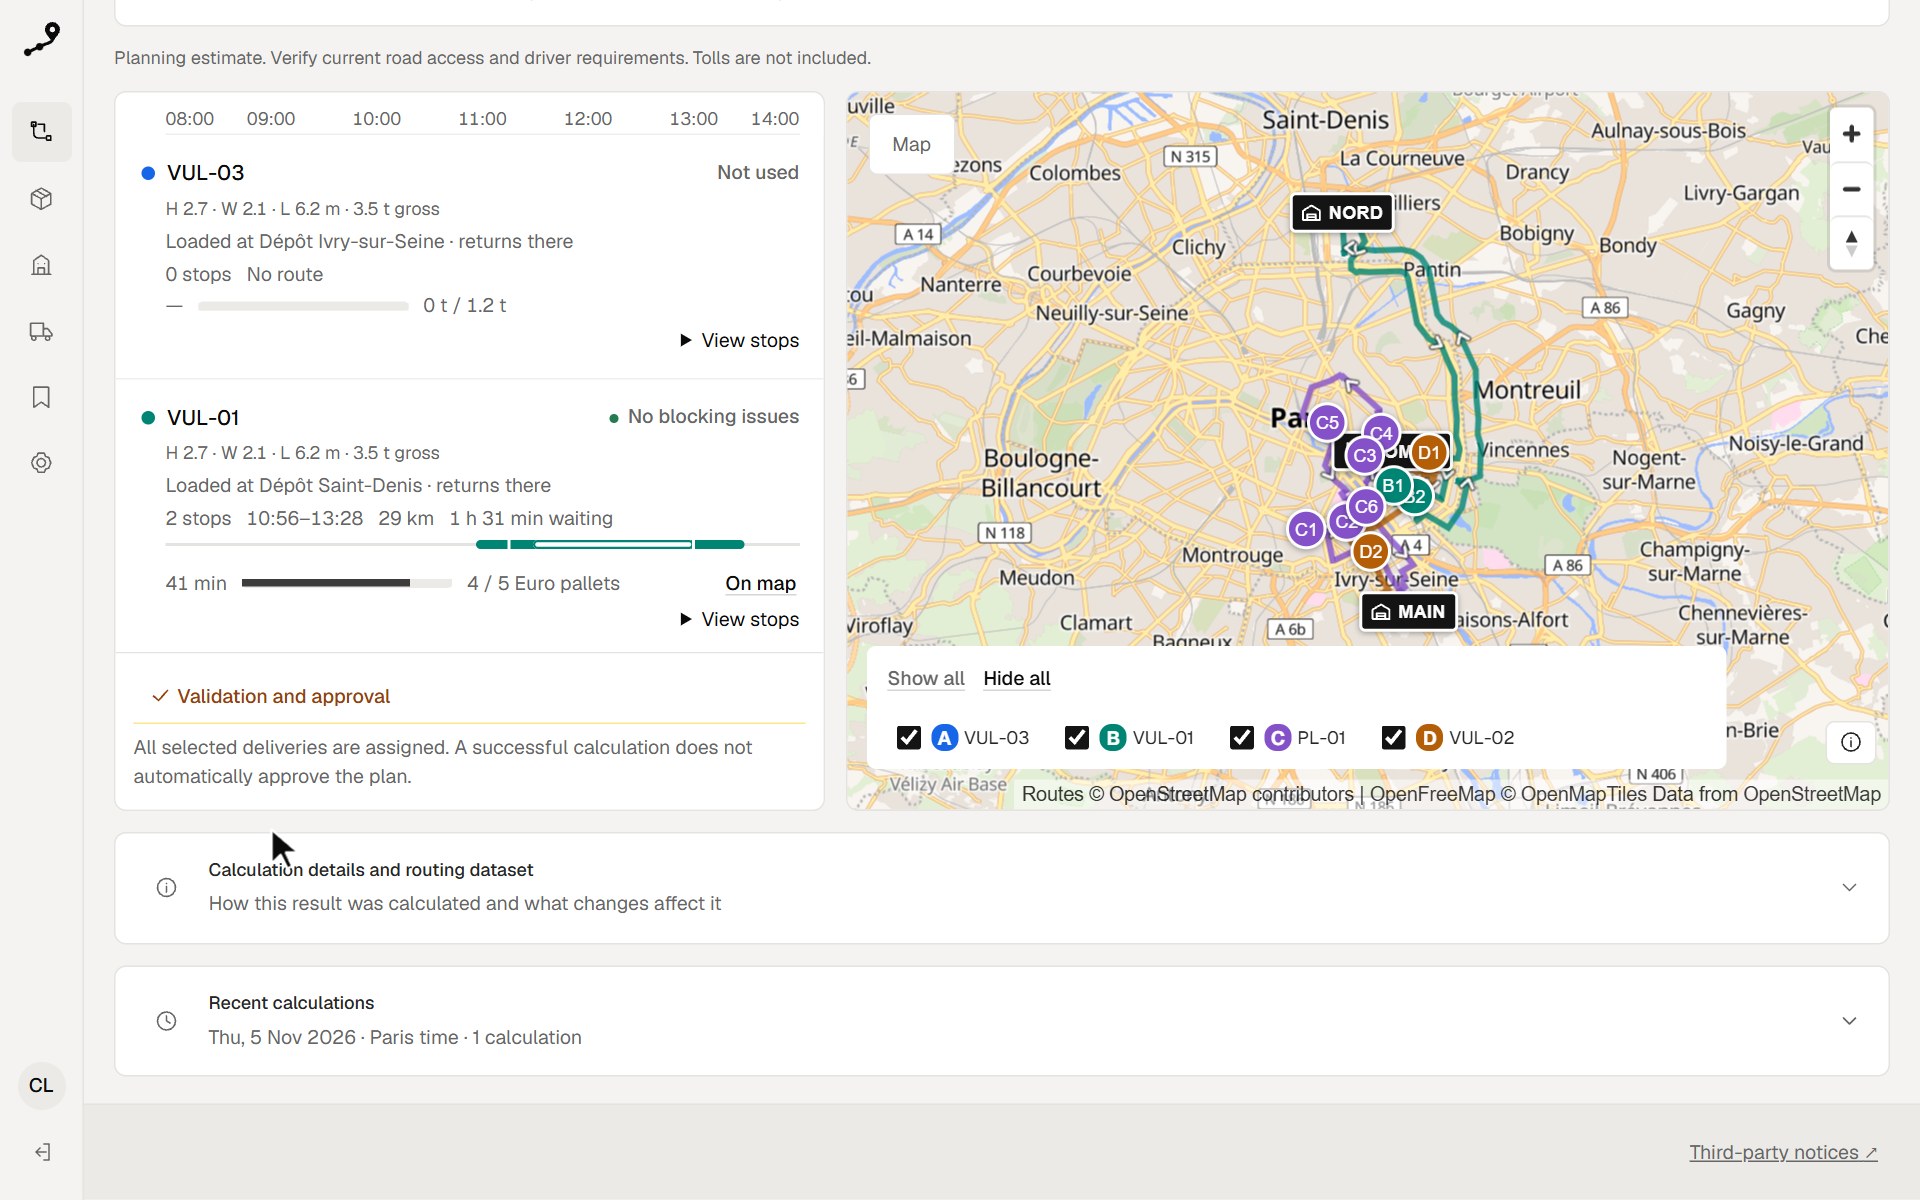
Invalid, stale or entirely unserved results cannot be approved. A valid partial plan requires explicit acceptance of the unassigned deliveries; accepting them does not make those deliveries feasible.
3. Move a stop and recalculate
- Expand View stops and select a delivery.
- Choose Move this stop. In the panel, choose the Destination vehicle and the Insert position (At end or Before another delivery), then Apply stop move. Move to Unassigned takes it out of the routes. ↑ Move up and ↓ Move down also reorder the stop list with the keyboard.
- Choose Recalculate these routes, then review the new result.
While you edit, the panel warns when the destination vehicle would exceed a capacity or its stop limit, lacks required equipment, or does not start at the depot the delivery ships from. The assignment counts follow your moves; the distance, time and cost shown stay those of the previous result until you recalculate.
Recalculation keeps the order you chose and calculates its road legs. The vehicle leaves as late as that order allows, to avoid needless waiting, while keeping the plan’s safety margin before each window ends and without going past the end of its hours. When the roads leave no such margin, it leaves as early as its hours allow. Validation then checks every constraint again.
Discard changes returns to the saved result after you confirm in Tournevia’s own dialog; Escape or a click beside the dialog keeps your moves. New calculation creates another plan without preserving the manual edits.
If someone saved this plan after you began editing, the screen says so. Choose Keep my moves on the latest version to apply your moves to the newest version — recalculating then replaces the other change with your assignment — or reload the draft.
4. Approve: Mark ready
Under the figures, a band states the plan’s approval and its next action. A draft says whether validation passed and how many deliveries are unassigned; a failed or pending result says why it cannot be approved and keeps the action disabled. When stops are reached 10 min or less before their window ends, the band names them.
- Check the current result for blocking issues and pending edits.
- For a partial result, Review unassigned in the band opens the first unassigned delivery. Review them, then tick I accept the unassigned deliveries in this partial plan if appropriate.
- Choose Mark ready in the band after your review.
The band of a Ready plan reads Ready · version …, with the time it was marked ready, and offers Print the route sheets and Export CSV. The page header keeps only New calculation and Reload plan.
If another Ready plan for this day already dispatches some of the same vehicles or deliveries, choose Keep the other plan or Replace the other Ready plan. Replacing returns the other plan to Draft; redistribute its routes if its sheets or file were already sent.
If deliveries, vehicles, the main depot or a depot or place in use changed after the calculation, the plan cannot be marked Ready, printed or exported: start a new calculation. The same applies when a delivery in the plan was cancelled or deleted, or when another depot becomes the main depot. Saved plans keep their own copy of the records.
Any edit clears Ready. After recalculating and approving, redistribute updated instructions to everyone who received the old ones. Costs are modeled, with no toll estimate or all-in total.
5. Print the route sheets
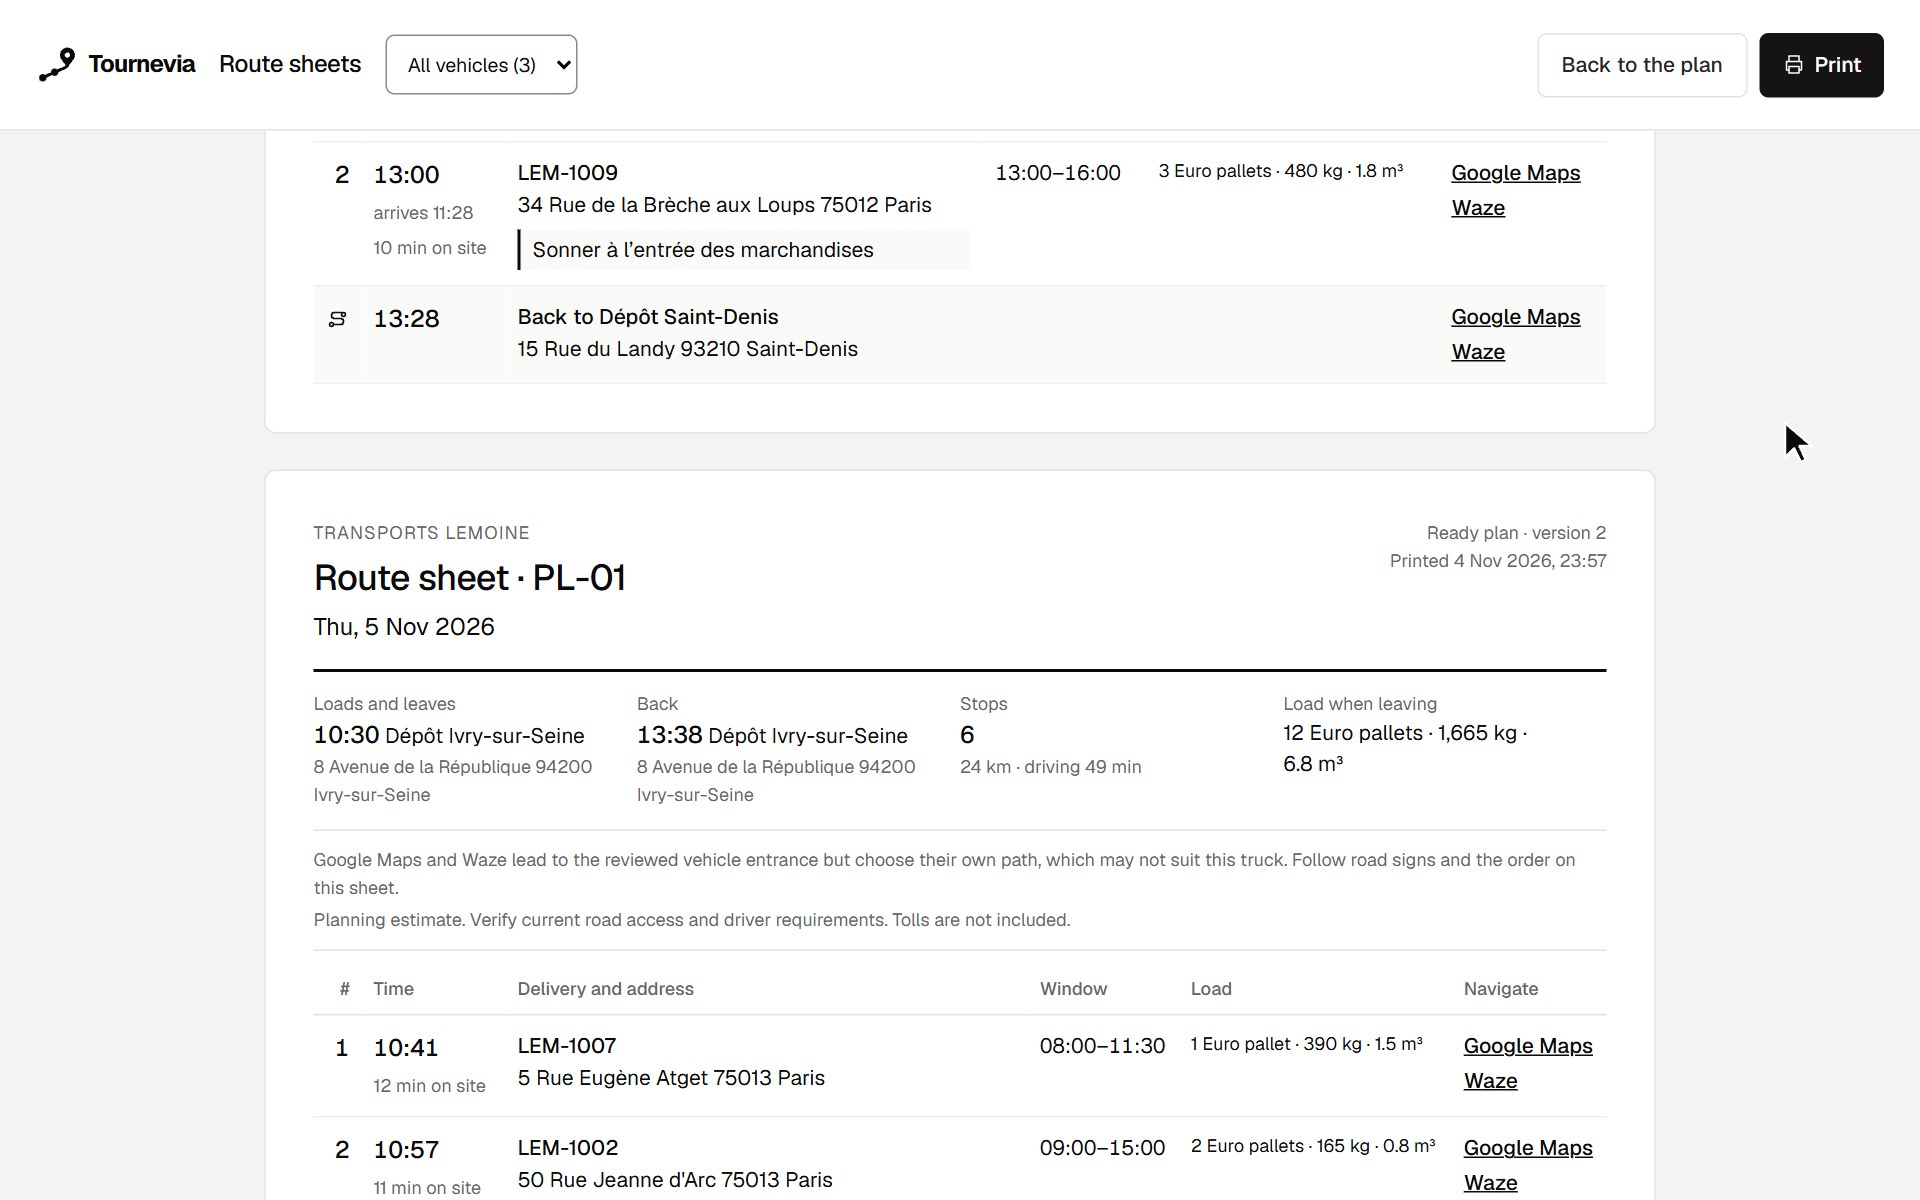
A Ready plan has route sheets for the drivers: one A4 page per vehicle that has deliveries.
- Choose Print the route sheets under the plan’s figures for every vehicle, or Route sheet for … under a route’s stops for one. The sheets open in a new tab.
- If the plan has several vehicles, pick one in All vehicles (…) or keep them all.
- Choose Print. To send the sheets to drivers, save them as PDF from the print dialog: the navigation links stay clickable in the PDF. Back to the plan returns to Planning.
Each sheet gives:
- Header: the company, the vehicle, the day, “Ready plan · version …” and the time it was printed.
- Start and end: Loads and leaves, with the time, the place and its address, then Back (or Ends when the route finishes elsewhere).
- Summary: the number of Stops, the distance, the driving time and the Load when leaving.
- Stops: the deliveries in driving order, with the time (and “arrives …” when the vehicle waits for the window to open), the time on site, the delivery number and customer code, the address, instructions, required equipment by name (for example Tail lift), the window and the load.
- End of route: a last row, “Back to …” or “End at …”.
Each stop and the end place have Google Maps and Waze links to the reviewed vehicle entrance. Printed, each stop also shows its coordinates and a Done box to tick. On a phone, the sheet reads as one card per stop.
The sheet states that Google Maps and Waze choose their own path, which may not suit the truck: the driver follows road signs and the order on the sheet. It also carries the notice “Planning estimate. Verify current road access and driver requirements. Tolls are not included.” The sheets of a plan of examples start with “Example data, not for driving.”
Route sheets follow the same conditions as the CSV export: each time they open, the server checks again that the plan is Ready, current and valid.
6. Export the CSV
Export CSV downloads the current Ready plan, one row per stop: plan and version, the vehicle’s departure and return, the codes of where it starts and ends (start_place, end_place), arrival, service start and departure in Europe/Paris time, the delivery’s reviewed coordinates, service window, quantities and equipment, and the planning notice in your language. In the French interface the file uses semicolons and a decimal comma for spreadsheet programs. See CSV formats.
7. Reopen a result
- Open Saved plans; it lists the plans for the selected date.
- Filter with All plans, Ready or Draft, or type an exact delivery ID in Find the plans that include a delivery.
- Each plan is named by the time it was made, for example “Plan of 17:29”; Updated shows a time only for a plan changed after it was made. Compare status, validation, deliveries served, vehicles, distance and modeled cost, then open the plan; its review state is preserved. Newer plans and Older plans page through the list.
- In Planning, Recent calculations shows the day’s attempts, each with its time and status, without resubmitting them.
If calculation fails, read troubleshooting before submitting again.
8. Share or bookmark a plan
The address keeps the section, the date and the open plan, for example #/planning?date=2026-09-23&plan=…. Send it to a colleague who has an account, or bookmark it. Back and Forward ask before discarding unsaved route moves.
Locate a stop on the map
Selecting a delivery connects its row with its map marker. Each marker shows its route letter and stop number, so routes are told apart without colour; Show all and Hide all choose the routes shown. Each route is drawn on the right of its direction, with arrows showing which way it goes: routes sharing a road sit side by side, and the selected route is drawn on top. The keyboard skips map markers: use the stop list, which selects the same stop. On a phone, List and Map switch between the two views.